7
English
ASSEMBLY AND OPERATION
APPLICATIONS
⅜
Sanding finish and flooring finish of woodwork
products.
⅜
Base polishing of Lumber-coated planes.
⅜
Sandfng finishes of metal surfaces.
⅜
Base polishing of metal-coated planes, rust
removal, or paint removal paint to refinishing.
⅜
Surfacial finish of slate, concrete, and so on.
PRIOR TO OPERATION
1. Power source
Ensure that the power source to be utilized
conforms to the power source requirements
specified on the product nameplate.
2. Power switch
Ensure that the switch is in the OFF position. If the
plug is connected to a receptacle while the switch
is in the ON position, the power tool will start
operating immediately and can cause serious
injury.
3. Extension cord
When the work area is far away from the power
source, use an extension cord of sufficient
thickness and rated capacity. The extension cord
should be kept as short as practicable.
WARNING:
Damaged cord must be replaced or
repaired.
4. Check the receptacle
If the receptacle only loosely accepts the plug, the
receptacle must be repaired. Contact a licensed
electrician to make appropriate repairs.
If such a fautly receptacle is used, it may cause
overheating, resulting in a serious hazard.
5. Confirming condition of the environment:
Confirm that the work site is placed under
appropriate conditions conforming to prescribed
precautions.
HOW TO HANDLE SANDING BELT
WARNING:
Be sure to switch power OFF and disconnect the
plug from the receptacle to avoid serious trouble.
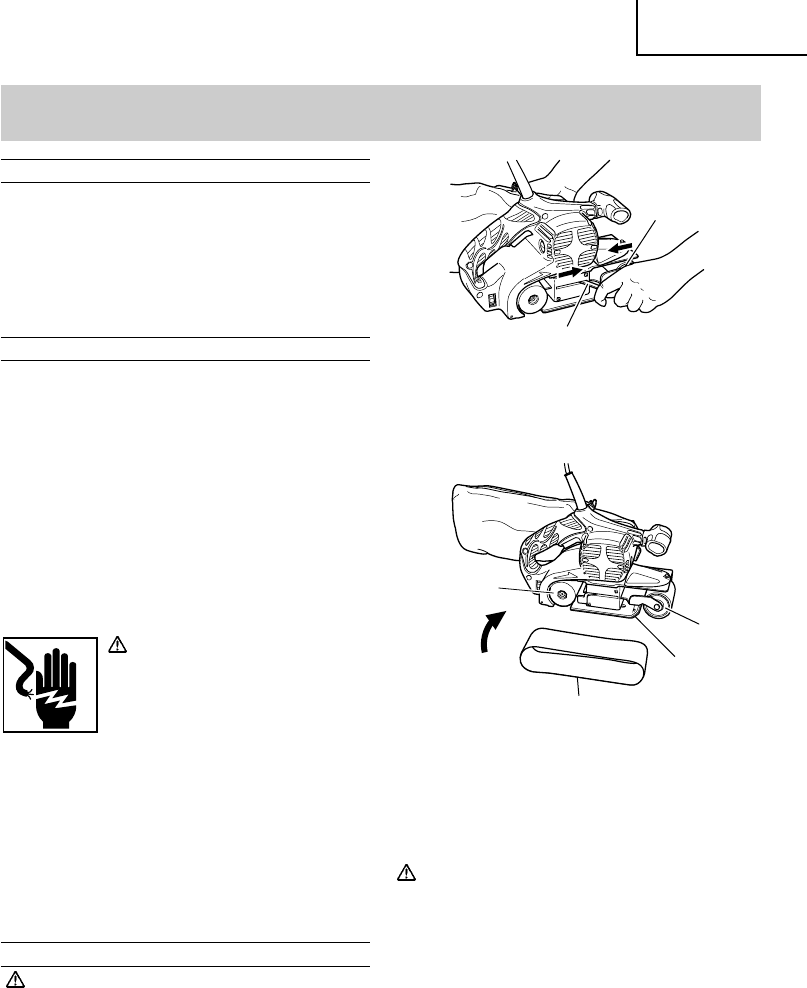
1. How to attach sanding belt
(1) Pull lever with finger, idle pulley will then move
backward.
(2) Place on drive pulley and idle pulley passing it over
the outside of shoe plate and making sure that
arrow on inside of belt coincides with rotational
direction of drive pulley.
Fig. 2
Lever
Idle pulley
Fig. 3
Rotational
direction
Drive pulley
Shoe plate
Idle
pulley
Sanding belt
(3) Push lever with finger, idle pulley will then move
forward and give proper tension to sanding belt.
In this case, be careful not to be hit your finger by
lever.
Then, adjust sanding belt position. (refer to page 8)
CAUTION:
Sanding belt installed in the wrong direction will
lower work efficiency and shorten life of sanding
belt.
2. How to remove sanding belt
Pull lever with finger, sanding belt will then sag
and can be taken off pulleys eqsily.
DUST REMOVAL
When an excessive amount of dust is deposited in the
dust bag, dust-collecting efficiency will sharply drop.
Remove dust from the bag when it is deposited up to
about 2/3 the bag capacity, where by dust collecting
efficiency (as well as working efficiency) will be ensured.


