


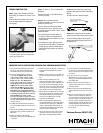
TROUBLE-SHOOTING TIPS.
Issue: Support Arm Assembly has prob-
lems sliding, or handle is too “loose” or too
“tight”.
Solution: Remove any debris from beam
slots. Re-Adjust handle bolt tightness.
(see below).
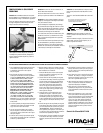
Issue: “T” Track or “T” slot on Baserail is
damaged.
Solution: File track or slot with flat file to
remove burr/bump.
Issue: Saw is unstable when the
“Toolmount Handles” are put in the unlock
position to remove saw.
Solution: Loosen the Toolmount Beam
fasteners (to the saw or Toolmount) and
re-position the saw, forward or back, on the
Toolmount Bases.
• Re-positioning the saw will balance it,
for ease of removal and installation to
the baserail, when the handles are in the
unlock position.
• For sliding miter saws, sliding and lock-
ing the saw motor & blade to an alternate
position during removal and installation
should sufficiently stabilize the saw/tool-
mount unit.
Issue: Saw has rubber foot pads on the
saw base that make tool mount installation
difficult.
Solution: Remove rubber foot pads
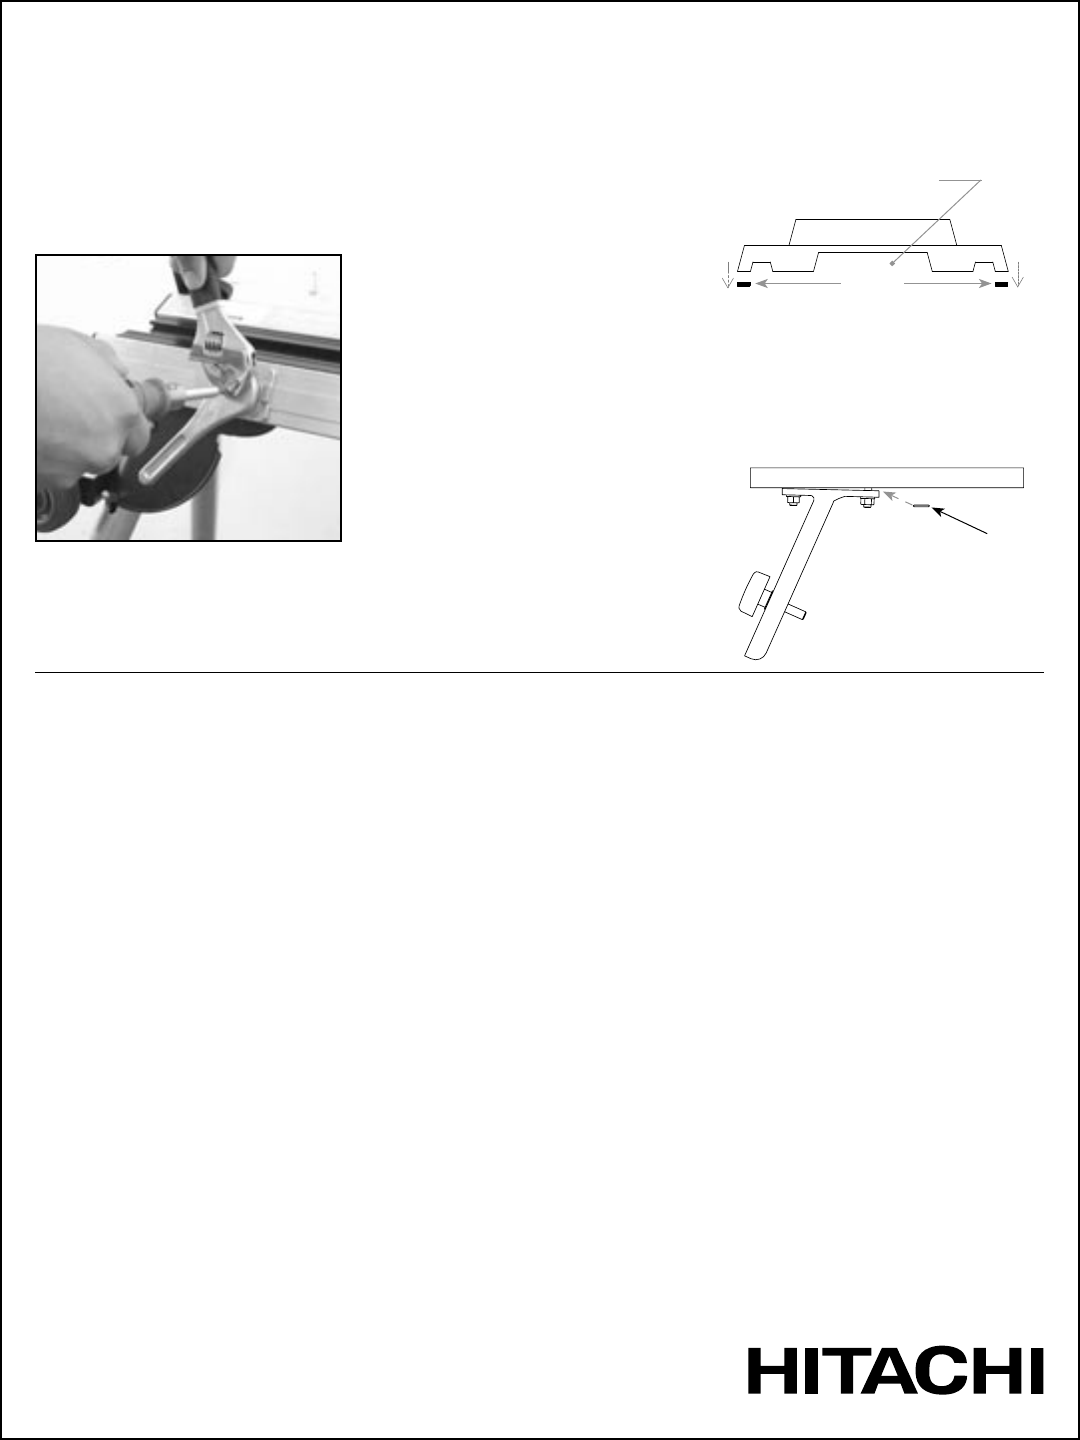
Issue: Work support is not horizontal or
parallel with the saw table or other support.
Solution: Change angle by placing 5/16’’
washer between the support beam and “T’.
Re-tighten nuts.
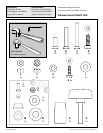
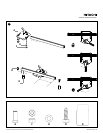
1. Read the Universal Workstation instruction
manual care-fully before assembling the
workstation and mounting the miter saw.
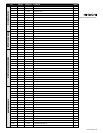
2. This Universal Workstation is designed
to be used with Hitachi (C8FB2, C10FCB,
C10FS, C10FSB, C10FCE, C10FCH, C10FSH,
C12LCH, C12FCH, C12LC, C12LDH, C12FDH),
Bosch (3915, 3912, 4412), Delta (MS150,
36.075, 36.225, 36-085, 36-225, 36-585, M275,
MS250, MS350, 36-255, 36-255L, MS450),
DeWalt (DW703, DW 708, DW705, DW706,
DW706, DW709), Makita (LS1011N, LS1013,
LS1212, LS1220, LS1221), Milwaukee (6490),
Porter-Cable (3807, 3802), Rigid (MS1065LZ,
MS1250LZ, MS1290LZ), Ryobi (TS1301, TS1340,
TS1350DX, TS1352DXL, MS1250LS, S1551DXL),
Sears Craftsman (137.212000, 72.24360,
315.21213, 315.212400, 315.212500, 137.212924,
315.212240, 009.23240, 009.29723), Miter Saws.
Use with additional Miter Saw models has not
yet been verified.
3. The Miter Saw should be firmly mounted to
the Universal Workstation per the instruction
manual.
4. After mounting the Miter Saw to the Universal
Workstation, align, position and balance the
Miter Saw.
5. Before use, verify that all Universal
Workstation parts are free from damage and/
or deformity.
6. Before use, verify that all parts or components
of the Universal Workstation are properly
installed.
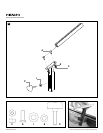
7. Before use, swing open each of the legs until
the brass pin clicks, locking the legs in posi-
tion.
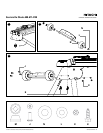
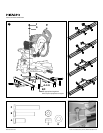
8. When mounting the Miter Saw to the
Universal Workstation, make sure that the
tool mount handles are in the “UNLOCK” posi-
tion, so the tool mount will engage with the
main beam. Be sure to hold the saw until it is
secured to prevent it from falling off the main
beam. Handles should then be tightened.
9. Before operating the Miter Saw, confirm that
the tool mount handles on both sides of this
Universal Workstation are firmly tightened
ensuring that the Miter Saw is securely
mounted to the Workstation.
10. When removing the Miter Saw from the
Universal Workstation, loosen the tool mount
handles until they rotate to the “UNLOCK””
position. Hold the Miter Saw firmly to pre-
vent the saw from falling off the main beam.
Carefully remove the Miter Saw.
11. Disconnect the power plug from the power
outlet when mounting or dismounting the
Miter Saw to the Universal Workstation.
12. Do not modify the Universal Workstation in
any manner or use the Universal Workstation
for any purpose other than is stated in these
instructions.
13. Do not sit or stand on the Universal
Workstation. Do not place, hang, or install
anything on the Universal Workstation other
than a Miter Saw.
14. Always use this universal workstation on
a level surface. Do not use it on uneven or
unstable surfaces.
15. Before operating the mounted Miter Saw,
read the Miter Saw instruction manual care-
fully.
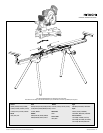
16. Because cut material may cause the work-
station to become unbalanced, always be
sure the material is supported properly. Also,
if the piece being cut is placed far beyond
the work support, workstation legs on the
opposite side may suddenly be lifted up due
to weight imbalance. To prevent this from
occurring, hold the opposite side firmly
before cutting.
Customer Service 508-677-4130
To adjust the tension of the bolt, keep handle
in the down position, back nut off, adjust bolt
tension and re-tighten nut.
IMPORTANT SAFETY INSTRUCTIONS FOR USING THIS UNIVERSAL WORKSTATION
Hitachi-Koki, USA, Ltd
If necessary on some saws.
Toolmount handle can be positioned
under this cavity.
Saw Base. (Side view)
Foot pads
Washer
Support Beam
“T”
10 INSTRUCTION MANUAL
TracRac Inc. 994 Jefferson Street, Fall River, MA 02721-4893 • 508-677-4130