


4
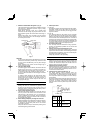
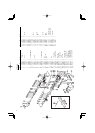
7. IMPACT to ROTATION changeover: (Fig. 2)
The Impact Drill can be switched from IMPACT (impact
plus rotation) to ROTATION (rotation only) by simply
turning the change ring.
When boring concrete, stone, tile or similar hard
materials, turn the change ring fully clockwise. The drill
head impacts against the material while
continuing to
rotate.
When boring metal, wood or plastic, turn the change
ring fully counterclockwise. The drill simply rotates as
an ordinary electric drill.
Change ring
Gear cover
Rotation
Rotation + impact
1
2
Fig. 2
CAUTION
Do not use the Impact Drill in the IMPACT function if the
material can be bored by rotation only. Such action will
not only reduce drill effi ciency, but may also damage
the drill tip.
When changing over, ensure that the change ring is
turned as far as it will go.
8. Fixing the side handle.
Loosen the glip on the side handle, and attach the side
handle to the gear cover in a position convenient for
drilling. Match the projecting part of the handle to the
groove on the gear cover, and fi rmly tighten
the glip.
To remove the side handle, loosen the glip, and rotate
the handle.
To attach a depth stopper on the side handle, insert
the stopper into the hexagon hole groove on the side
handle, adjust the position of the depth stopper in
accordance with the desired depth of the hole,
and
fi rmly tighten the glip.
PRACTICAL HANDLING PROCEDURES
1. Pressure:
Drilling will NOT be accelerated by placing heavy
pressure on the drill. Such action will only result in a
damaged drill bit, decreased drilling effi ciency and/or
shortened service life of the drill.
2. Using a large diameter drill bit:
The larger the drill bit diameter, the larger the
reactive
force on your arm. Be careful not to lose control of the
drill because of this reactive force. To maintain fi rm
control, establish a good foothold, hold the drill tightly
with both hands, and ensure that the drill is vertical to
the material being drilled.
3. When drilling completely through
the material:
When the drill bit bores completely through the material,
careless handling often results in a broken drill bit
or damage to the drill body itself due to the sudden
movement of the drill.
Always be alert and ready to release the pushing force
when drilling through the material.
4. Switch operation:
(1) VTP-16A:
By pulling the trigger switch and depressing the stopper,
the switch is held in the ON position for continuous
operation. To turn the drill OFF, pull the trigger switch
again and release.
(2) VTV-16:
The rotational speed of the drill bit can be controlled
by varying the
amount that the trigger switch is pulled.
Speed is low when the trigger switch is pulled slightly
and increases as the switch is pulled more. Continuous
operation may be attained by pulling the trigger switch
and depressing the stopper. To turn the switch OFF, pull
the trigger switch again to
disengage the stopper, and
release the trigger switch to its original position.
5. Precautions on boring
The drill may become overheated during operation;
however, it is suffi ciently operable. Do not cool the drill
bit in water or oil.
6. Caution concerning immediately after use
Immediately after use, while it is
still revolving, if the Drill
is placed on a location where considerable ground chips
and dust have accumulated, dust may occasionally be
absorbed into the Drill mechanism.
Always pay attention to this possibility.
MAINTENANCE AND INSPECTION
1. Inspection the drill bit
Continued use of a worn and/or damaged drill bit will
result in reduced drilling effi ciency and may seriously
overload the drill motor. Inspect the drill bit often and
replace it with a new bit as necessary.
2. Inspecting the mounting screws
Regularly inspect all mounting
screws and ensure that
they are properly tightened. Should any of the screws
be loose, retighten them immediately. Failure to do so
could result in serious hazard.
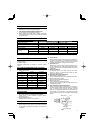
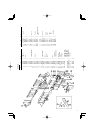
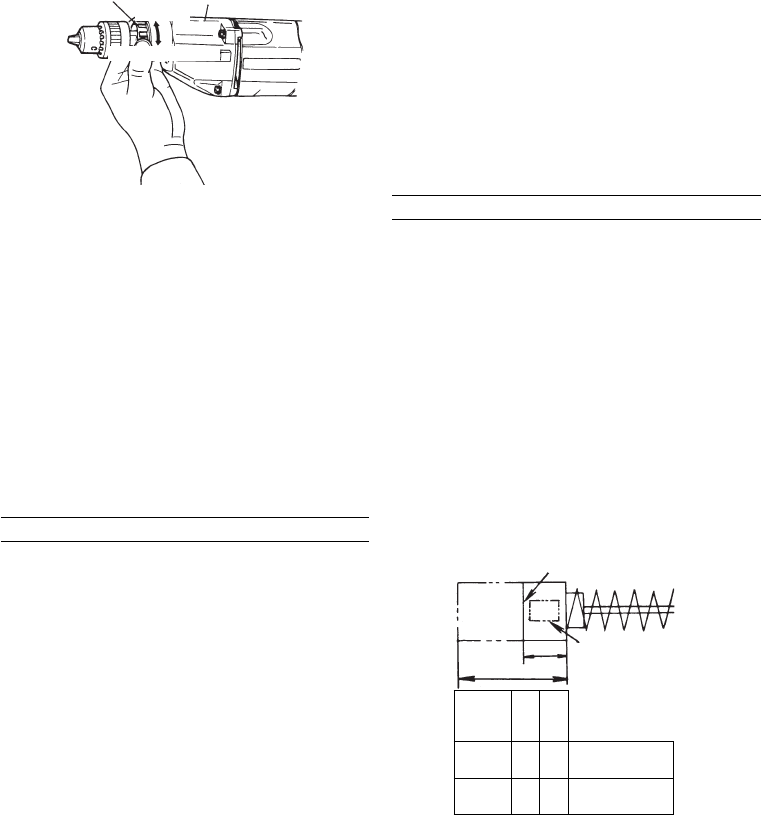
3. Inspecting the carbon brushes (Fig. 3)
The Motor employs carbon brushes which are
consumable parts. When they become worn to or near
the
“wear limit”, it could result in motor trouble. When an
auto-stop carbon brush is equipped, the motor will stop
automatically.
At that time, replace both carbon brushes with new ones
which have the same carbon brush Numbers shown in
the fi gure. In addition, always keep carbon brushes
clean and ensure
that they slide freely within the brush
holders.
Wear limit
No. of carbon brush
No. of
carbon
brush
ab
43 17 6
Usual carbon
brush
73 17 7
Auto-stop
carbon brush
b mm
a mm
Fig. 3