


10
English
(2) Avoid recharging at high temperatures.
A rechargeable battery will be hot immediately after
use. If such a battery is recharged immediately after
use, its internal chemical substance will deteriorate,
and the battery life will be shortened. Leave the battery
and recharge it after it has cooled for a while.
CAUTION:
⅜ When the battery charger has been continuosly used,
the battery charger will be heated, thus constituting
the cause of the failures. Once the charging has been
completed, give 15 minutes rest until the next
charging.
⅜ If the battery is recharged when it is warm due to
battery use or exposure to sunlight, the pilot lamp
map light in green.
The battery will not be recharged. In such a case, let
the battery cool before charging.
⅜ When the pilot lamp flickers in red (at 0.2-second
intervals), check for and take out any foreign objects
in the charger’s battery installation hole. If there are
no foreign objects, it is probable that the battery or
charger is malfunctioning. Take it to your authorized
Service Center.
PRIOR TO OPERATION
1. Preparing and checking the work environment
Make sure that the work site meets all the conditions
laid forth in the precautions.
2. Checking the battery
Make sure that the battery is installed firmly. If it is at
all loose it could come off and cause an accident.
3. Selecting the socket matched to the bolt
Be sure to use a socket which is matched to the bolt
to be tightened. Using an improper socket will not
only result in insufficient tightening but also in
damage to the socket or nut.
A worn or deformed hex. or square-holed socket will
not give an adequate tightness for fitting to the nut or
anvil, consequently resulting in loss of tightening
torque.
Pay attention to wear of socket hole, and replace
before further wear has developed.
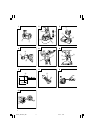
4. Installing a socket
Select the socket to be used.
ⅷ Pin, O-ring type
(1) Align the hole in the socket with the hole in the anvil
and insert the anvil into the socket.
(2) Insert the pin into the socket.
(3) Attach the ring to the groove on the socket.
ⅷ Plunger type
Align the plunger located in the square part of the
anvil with the hole in the hex. socket. Then push the
plunger, and mount the hex. socket on the anvil.
Check that the plunger is fully engaged in the hole.
When removing the socket, reverse the sequence.
ⅷ Retaining ring type
(1) Align the square portions of the socket and the anvil
with each other.
(2) Make sure to firmly install the socket by pushing it all
the way into the anvil.
(3) When removing the socket, pull it out of the anvil.
CAUTION:
⅜ Please use the designated attachments which are
listed in the operations manual and Hitachi’s catalog.
Accidents or injuries could result from not doing so.
⅜ Make sure to firmly install the socket in the anvil. If
the socket is not firmly installed it might come out
and cause injuries.
HOW TO USE
1. Operation of switch
The switch in this machine functions as a motor
switch and rotational direction selector switch. When
the switch is set to
R
indicated on the handle, the
motor rotates clockwise to tighten the bolt. When the
switch is set to
L
, the motor rotates counterclockwise
to loosen the bolt. When the switch is released, the
motor stops. (Fig. 5)
CAUTION:
Be sure to turn the switch OFF and wait until the
motor completely stops before changing the direction
of wrench revolution. Switching while the motor is
rotating will result in burning the motor.
2. How to use the LED light
Push the upper position of the light switch for turning
on the light and the lower position for off. (Fig. 6)
CAUTION:
Do not expose directly your eye to the light by looking
into the light.
If your eye is continuously exposed to the light, your
eye will be hurt.
3. Tightening and loosening bolts
A hex. socket matching the bolt or nut must first be
selected. Then mount the socket on the anvil, and
grip the nut to be tightened with the hex. socket.
Holding the wrench in line with the bolt, press the
power switch to impact the nut for several seconds.
If the nut is only loosely fitted to the bolt, the bolt
may turn with the nut, therefore mistaking proper
tightening. In this case, stop impact on the nut and
hold the bolt head with a wrench before restarting
impact, or manually tighten the bolt and nut to prevent
them slipping.
OPERATIONAL CAUTIONS
1. Resting the unit after continuous work
After use for continuous bolt-tightening work, rest
the unit for 15 minutes or so when replacing the
battery. The temperature of the motor, switch, etc.,
will rise if the work is started again immediately after
battery replacement, eventually resulting in burnout.
NOTE:
Do not touch the metal parts, as it gets very hot
during continuous work.
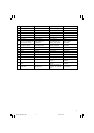
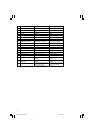
2. Work at a tightening torque suitable for the bolt
under impact
The optimum tightening torque for nuts or bolts differs
with material and size of the nuts or bolts. An
excessively large tightening torque for a small bolt
may stretch or break the bolt. The tightening torque
increases in proportion to the operaton time. Use the
correct operating time for the bolt.
3. Holding the tool
Hold the impact wrench firmly with both hands. In
this case hold the wrench in line with the bolt.
It is not necessary to push the wrench very hard.
Hold the wrench with a force just sufficient to
counteract the impact force.
01Eng_WR18DHL_WE 12/14/10, 8:5810