


11
English
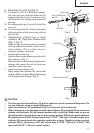
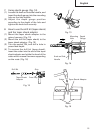
6. Mounting the drill bit (Fig. 2)
(1) To attach a drill bit (SDS-plus shank),
fully pull the grip in the direction of the
arrow as shown in Fig. 2 and insert the
drill bit as far as it will go while manually
turning.
(2) By releasing the grip, the drill bit will be
secured.
(3) To remove the drill bit, fully pull the grip
in the direction of the arrow and pull out
the drill bit.
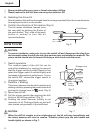
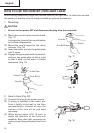
7. Installation of dust cup or dust
collector (B) (Optional accessories)
(Fig. 3, Fig. 4)
When using a rotary hammer for upward
drilling operations attach a dust cup or
dust collector (B) to collect dust or
particles for easy operation.
⅜ Installing the dust cup
Use the dust cup by attaching to the drill
bit a shown in Fig. 3.
When using a bit which has big diameter,
enlarge the center hole of the dust cup
with this rotary hammer.
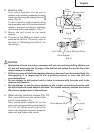
⅜ Installing dust collector (B)
When using dust collector (B), insert dust
collector (B) from the tip of the bit by aligning
it to the groove on the grip. (Fig. 4)
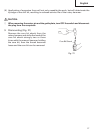
CAUTION:
⅜ The dust cup and dust collector (B) are for exclusive use of concrete drilling work. Do
not use them for wood or metal drilling work.
⅜ Insert dust collector (B) completely into the chuck part of the main unit.
⅜ When turning the rotary hammer on while dust collector (B) is detached from a concrete
surface, dust collector (B) will rotate together with the drill bit. Make sure to turn on
the switch after pressing dust cup on the concrete surface. (When using dust collector
(B) attached to a drill bit that has more than 7-15/32" (190 mm) of overall length, dust
collector (B) cannot touch the concrete surface but rotates. Therefore please use dust
collector (B) by attaching to drill bits which have 6-17/32" (166 mm), 6-19/64" (160
mm) and 4-21/64" (110 mm) overall length.)
Fig. 2
Dust Cup
Fig. 4
Dust Collector (B)
Fig. 3
Part of SDS-plus
Shank
Front Cap
Grip
Drill Bit