


6
English
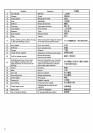
⅜ Asphalt cutting (striking)
⅜ Syringe (for chip removal)
⅜ Hammer grease A
500 g (in a can)
30 g (in a green tube)
Optional accessories are subject to change without
notice.
APPLICATIONS
⅜ Drilling holes in concrete
⅜ Drilling anchor holes
⅜ Crushing concrete, chipping, digging, and squaring
(by applying optional accessories)
PRIOR TO OPERATION
1. Power source
Ensure that the power source to be utilized conforms
to the power requirements specified on the product
nameplate.
2. Power switch
Ensure that the power switch is in the OFF position.
If the plug is connected to a power receptacle while
the power switch is in the ON position, the power
tool will start operating immediately, which could
cause a serious accident.
3. Extension cord
When the work area is removed from the power
source, use an extension cord of sufficient thickness
and rated capacity. The extension cord should be
kept as short as practicable.
4. How to install tool
NOTE
For tools such as a bull point and a cold chisel, use
only Hitachi genuine parts.
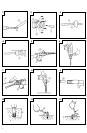
(1) Clean, then smear the tool shank with the grease
provided in the green tube (Fig. 1).
(2) The grip can be rotated manually at an 60° angle.
Fully turn the grip in the direction of the arrow A
as shown in Fig. 2 so that the
mark on the grip
is aligned with the
mark on the front sleeve.
(Fig. 2)
(3) Insert the shank of the tool until it makes contact
with the back side of the hole. (Fig. 2)
(4) Turn the grip in the direction of “Lock
” so that
the
mark on the grip is aligned with the
mark on the front sleeve. The tool is locked.
Remove the drill bit in the reverse order. (Fig. 2)
5. Fixing Dust cup
When a worker is engaged in an operation with the
main body faced upward, if a dust cup is fixed to
a drill bit, the inside of a tool holder can be prevented
from any possible invasion of dust. The dust cup
should be fixed as explained below.
(1) Insert the dust cup into the drill bit. (Fig. 3)
(2) Fix the drill bit to the tool holder. (Fig. 4)
(1) Cutter
(3) Insert the drill bit until it hits the end of the hole,
and make sure that the dust cup is not in contact
with the tool holder. If the dust cup is found to be
in contact with the tool holder, shift it a little forward.
HOW TO USE THE HAMMER DRILL
1. How to drill holes (Fig. 5)
(1) Pull the switch trigger after applying the drill bit tip
to the drilling position.
(2) It is unnecessary to forcibly press the hammer drill
main body. It is sufficient to slightly press the
hammer drill to an extent that shavings are freely
discharged.
CAUTION
Although this machine is equipped with a safety
clutch, if the drill bit becomes bound in concrete
or other material, the resultant stoppage of the drill
bit could cause the machine body to turn in reaction.
Ensure that the main handle and side handle are
gripped firmly during operation.
2. How to chip or crush (Fig. 6)
By applying the drill bit tip to the chipping or
crushing position, operate the hammer drill by
utilizing its empty weight.
Forcible pressing or thrusting is unnecessary.
3. Install the stopper (Fig. 7)
(1) Loosen the side handle and insert the straight portion
of the stopper into the handle bolt hole.
(2) Move the stopper to the specified position and rotate
the side handle clockwise to fix the stopper.
4. Warming up (Fig. 8)
The grease lubrication system in this unit may require
warming up in cold regions.
Position the end of the bit so makes contact with
the concrete, turn on the switch and perform the
warming up operation. Make sure that a hitting
sound is produced and then use the unit.
CAUTION
When the warming up operation is performed, hold
the side handle and the main unit securely with both
hands to maintain a secure grip and avoid being
turned around by the drill.
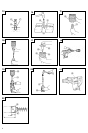
DRILLING AND DRIVING-IN OPERATIONS FOR
ANCHORS
Use the optional accessories for anchors, such as anchor
adapter and taper shank adapter.
1. When a rotation striking anchor adapter is used.
(1) Install the self-drilling anchor in the anchor adapter
(Fig. 9).
(2) Turn ON the switch and drill a base hole with the
self-drilling anchor. (Fig. 10)
At the start of the hole-drilling slightly tilt the hammer
drill to determine the hole position.
(3) After cleaning out dust with a syringe, attach the
plug to the anchor tip and drive in the anchor with
a manual hammer.
(4) After driving in the anchor, use the drift key to
separate the anchor. (Fig. 11)
(5) By employing a manual hammer or pliers, snap off
the tapered portion of the anchor. (Fig. 12)
CAUTION
Since the snapped-off tapered portion will fly out,
pay attention to the snapping direction.