


OM-259 Page 19
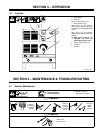
4-2. Troubleshooting
Trouble Remedy
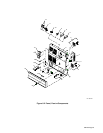
Completely inoperative; fan does not run. Place line disconnect switch in the On position.
Check and replace open line fuse(s) (see Section 2-13).
Check for proper jumper link positions (see Section 2-14).
Check for proper input connections (see Section 2-14).
No weld output; fan motor FM running. Reset circuit breakers CB1 and/or CB2, if necessary (see Section 2-12).
Unit overheated. Allow unit to cool with fan on (see Section 2-2).
Have Factory Authorized Service Agent check control relay CR1.
Excessive line current; line fuse(s) and/or circuit
breaker(s) open repeatedly.
Check for proper input connections (see Section 2-14).
Check for proper jumper link positions (see Section 2-14).
Weld output available; fan does not run. Check for and remove anything blocking fan blades.
Have Factory Authorized Service Agent check fan motor FM.
Fan runs slowly. Check for proper jumper link positions (see Section 2-14).
Limited output and low open-circuit voltage. Check and replace open line fuse(s) (see Section 2-13).
Check for proper input connections (see Section 2-14).
Check for proper jumper link positions (see Section 2-14).
Erratic or improper weld output. Check for proper jumper link positions (see Section 2-14).
Check for proper input connections (see Section 2-14).
Select correct size weld cables (see Section 2-10).
Clean and tighten weld cable connections (see Section 2-10).
Have Factory Authorized Service Agent adjust brush contact on slide wire.
For 250 ampere models, check tap slope connections (see Section 2-8).
For 300 ampere models, check inductance connections (see Section 2-9).
Install wire feeder according to it’s Owner’s Manual.
No 115 volts ac output at Remote 14 receptacle RC8. Reset circuit breaker CB1, if necessary (see Section 2-12).
No 24 volts ac output at Remote 14 receptacle RC8. Reset circuit breaker CB2, if necessary (see Section 2-12).