


Page 7
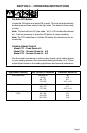
Adjustment of the Headgear for Maximum Comfort
There are four adjustments on Hobart headgear that can be adjusted for
maximum comfort:
1. Headgear Top – Adjusts headgear for proper depth on the head to en-
sure correct balance and stability.
2. Headgear tightness – To adjust, turn knob located on the back of the
headgear left or right to desired tightness.
3. Stop angle adjustment – Five pins on the right side of the headband top
provide adjustment for the forward tilt of the helmet. To adjust, loosen the
right outside tension adjustment knob and lift on the control arm tab to
move it to the desired position. Retighten tension adjustment knob.
4. Distance adjustment – Adjusts the distance between the face and the
lens. To adjust, loosen both outside tension knobs and slide forward or
back to desired position and retighten. (Both sides must be equally posi-
tioned for proper vision.)
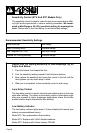
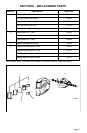
Replacement of the Front and Inside Lens Covers
Y Warning! Never use the auto-darkening lens without the inside
and outside lens covers properly installed. Welding spatter will
damage the auto-darkening lens voiding the warranty.
1. Outside − Place helmet on a flat surface. Grasp the front lens holder
with one hand while pushing the inside retaining clips of the lens hold-
er outward. Do one side at a time, gently pulling the front lens holder
away from the helmet as each tab is released from its retaining clip.
Once released, the outside cover lens can be replaced.
2. Inside − Remove the inside lens cover by following the procedure in
Step 1. With the auto-darkening lens removed from the helmet, re-
move the inside cover lens by prying the lens up at the thumbnail
opening located at the top center of the cover lens. Replace the lens
by gently bowing it in the center and inserting it, one end a time, into
the retaining clips located on the outside of the auto-darkening lens
assembly.
3. Reinstalling auto−darkening lens assembly − Gently place auto−
darkening lens in front of helmet. (Be careful not to drop lens.) Install
front lens cover with gasket. Grasp front lens holder and slowly insert
the six retaining pieces into front of helmet. (Make certain you gently
squeeze the outside edges of the front lens holder while inserting tabs
into helmet.) From the inside of helmet, gently push the retaining tabs
in to secure the front lens holder in place.