


4 5
• Have seizure disorder, unless consulting with a physician, example: epilepsy.
• Are pregnant or menstruating.
• Have cancer.
• Had a back operation before, and the lower back pain is caused from past surgery
or accident.
• Are suffering from a metabolic arthritis.
• Device should not be applied over swollen, infected, inamed areas, or skin
eruptions, ex. phlebitis, thrombophlebitis, varicose vein, etc.
• Device should not be applied over, or in proximity to, cancerous lesions.
• Have low back skin conditions of:
- Acutely or chronically diseased
(injured or irritated) skin
- Hypersensitive skin
- Allergy with the gel pad
- Scars
- Healing wounds
- Rashes
The proper use of this device is important to obtain temporary pain relief. Please
take the next few minutes to read this manual carefully and learn the correct opera-
tion of this easy-to-use equipment.
This Rapid Relief device is indicated for temporary relief of pain associated with sore
and aching muscles in the lower back as a result of strain from exercises or normal
household and work activities.
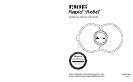
WHAT IS RAPID RELIEF?
Rapid Relief is a TENS device - TENS stands for Transcutaneous Electrical Nerve
Stimulation. The device emits controlled micro-electric currents called impulses
through skin to interact with nerves for temporary pain relief.
The pain relieving effect comes from blocking the nerve pathway transmitting pain
signals.
- Inamed skin
- Bruises
- Swelling
- Hemorrhage following acute trauma
or fracture after use
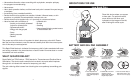
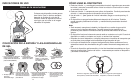
INDICATIONS FOR USE
Low Back Pain
Place this device where you appear
to have pain. For optimum result,
move device to the other spot
indicated on the image on the left,
after finishing 20 minute cycle.
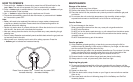
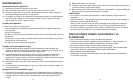
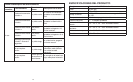
BATTERY AND GEL PAD ASSEMBLY
5. Remove blue film
from the gel pads.
6. Place exposed side
onto the unit and press
firmly with fingertips to
adhere.
7. Remove clear film from
the back of the gel,
pulling slowly to ensure
the gel stays in place.
8. Your unit is now ready to
place where it hurts.
Note:
Clean skin area before applying.
3. Insert battery provided
“+” side up
(CR2032
Lithium battery only).
2. Flip open battery cover
with a pin.
1. Use a coin or small device
to turn the battery door to
the OPEN position.
4. Close and lock battery
cover.