


T7147 REMOTE SENSOR AND OVERRIDE MODULE
63-4065—16
OPERATION
Sensor
The remote sensor control element is a negative temperature
coefficient (NTC) thermistor. As room temperature increases,
the resistance of the thermistor decreases. As room
temperature decreases, the resistance of the thermistor
increases. The T7300 detects the thermistor resistance
change and controls the space temperature by sequentially
staging the heating/cooling equipment on and off.
NOTE: The T7047C1025 uses the same sensor element.
3 Hour Occupied
When correctly wired, pressing the
3 Hour Occupied
key
sends a signal from the T7147 to the T7300/Q7300. Upon
receipt of this signal, the T7300/Q7300 proceeds into the
3 Hour Occupied override. In response, the T7300/Q7300
sends a signal back to the T7147 to turn on the 3 Hour
Occupied LED. The 3 Hour Occupied LED remains on for
the duration of the 3 hour override.
NOTE: For additional details, consult the T7300/Q7300
Specification sheet, form 63-4038.
3 Hour Setpoint Adjust
When wired correctly, pressing the
3 Hour Occupied
key,
followed by the
Warmer
or
Cooler
key sends a signal from the
T7147 to the T7300/Q7300. The T7300/Q7300, upon receipt
of this signal, proceeds into the 3 Hour Setpoint Adjust
override. In response, the T7300/Q7300 sends a signal back
to the T7147 that turns on the 3 Hour Occupied LED and the
appropriate Warmer or Cooler LED. The 3 Hour Occupied
LED and Warmer or Cooler LED remains on for the duration
of the 3 hour override.
This override may be performed at any time, regardless of
whether the thermostat system is operating in the occupied
or unoccupied mode.
NOTES:
— For additional details, consult the T7300/Q7300
Specification sheet, form 63-4038.
— Premature exit from either override can be
achieved by pressing the
3 Hour Occupied
key
again. The T7300 then returns to normal operation.
CHECKOUT
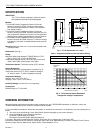
1.
Allow the sensor to stabilize to ambient conditions
before taking a resistance measurement. The sensor
resistance measurement should be in accordance with
the device temperature curve (see Fig. 2).
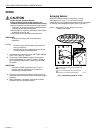
2.
Check operation of the
3 Hour Occupied
key:
a. Press the
3 Hour Occupied
key once.
b. The LED above the key turns on.
3.
Go to the T7300 thermostat and check it to see that the
display arrow indicator points to
3 Hr Occupied
.
4.
On models with
Warmer
and
Cooler
keys:
a. Press the
Warmer
key once.
b. The LED above the
Warmer
key comes on.
c. Press the
Cooler
key.
d. The LED above the
Warmer
key turns off and the
LED above the
Cooler
key turns on.
e. Press the
3 Hour Occupied
key once.
f. The LED above this key turns off, as well as those
above either the
Warmer
or
Cooler
keys.
5.
Go to the T7300 thermostat and check to see that the
arrow indicator on the display no longer points to
3 Hr
Occupied
and has returned to its currently programmed
occupied or unoccupied period.
NOTE: If the T7147 does not check out, review the
wiring and connections between the Q7300
and the T7147. Replace the T7147 if wiring
continuity checks out. If the new T7147 does
not check out, replace the Q7300.
6.
Check operation of the complete control system as
directed in the T7300/Q7300 Specification sheet, form
63-4038.