


4
English
2. Operate this demolition hammer by utilizing its
own weight.
The performance will not be better even if it is
pressed or thrust forcibly against the work surface.
Hold this demolition hammer with a force just
sufficient to counteract the reaction.
CAUTION
Sometimes the power tool does not begin the
striking stroke even when the motor rotates because
the oil has become thick.
If the power tool is used at low temperatures or
if it is used after a long idle time, this demolition
hammer should be kept running in for about five
minutes in order to warm it up.
HOW TO REPLACE GREASE
This demolition hammer is full air-tight construction
to protect against dust and to prevent lubricant leakage.
Therefore, this demolition hammer can be used without
lubrication for long periods. Replace the grease as
described below.
Grease replacement period
After purchase, replace grease after every 6 months
of usage. Ask for grease replacement at the nearest
authorized service center.
MAINTENANCE AND INSPECTION
1. Inspecting this demolition hammer
Use of a dull accessory, such as a bull point, a
cutter, etc., will cause motor malfunctioning and
degraded efficiently. Replace with a new one without
delay when abrasion is noted.
2. Inspecting the mounting screws
Regularly inspect all mounting screws and ensure
that they are properly tightened. Should any of the
screws be loose, retighten them immediately. Failure
to do so could result in serious hazard.
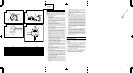
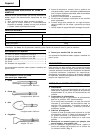
3. Inspecting the retainer (Fig. 1, Fig. 2)
The retainer may become loose due to excessive
use. Always, pay attention to its proper functioning
to securely hold the accessory shank portion. If any
wear and tear is found, bring this demolition
hammer to an authorized service center for
maintenance service.
4. Maintenance of the motor
The motor unit winding is the very “heart” of the
power tool. Exercise due care to ensure the winding
does not become damaged and/or wet with oil or
water.
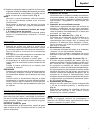
5. Inspecting the carbon brushes (Fig. 3)
The motor employs carbon brushes which are
consumable parts. When they become worn to or
near “wear limit”, it results in motor trouble. When
an auto-stop carbon brush is equipped, the motor
will stop automatically. At that time, replace both
carbon brushes with new ones which have the
same carbon brush Nos. shown in the figure 3. In
addition, always keep carbon brushes clean and
ensure that they slide freely within the brush holders.
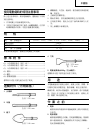
6. Replacement procedure
Loosen the screw (Hexagon socket hd. bolt M5 ×
10) of the tail cover, then remove the tail cover
(Fig. 4). After removing the brush cap, the carbon
brush can be removed.
After replacing the carbon brush, tighten the brush
cap, then mount the tail cover securely.
NOTE
Due to HITACHI’s continuing program of research and
development, the specifications herein are subject to
change without prior notice.