


3
English
CHARGING
Before using the power tool, charge the battery as
follows.
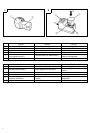
1. Insert the battery in the charger.
Position the battery so that the nameplate faces
toward the nameplate of the charger and press in
the battery until it comes into contact with the
bottom surface. (See Figs. 1 and 2)
2. Connect the charger power cord to the receptacle.
Connecting the power cord will turn on the charger
(the pilot lamp lights up).
CAUTION
If the pilot lamp does not light up, pull out the
power cord from the receptacle and check the
battery mounting condition.
About 1 hour is required to fully charge the battery
at a temperature of about 20°C. The pilot lamp goes
off to indicate that the battery is fully charged.
CAUTION
If the battery is heated due to direct sunlight,
etc., just after operation, the charger pilot lamp
may not light. At that time cool the battery first,
then start charging.
3. Disconnect the charger power cord from the
receptacle.
4. Hold the charger tight and pull out the battery.
MAINTENANCE AND INSPECTION
1. Inspecting the mounting screws
Regularly inspect all mounting screws and ensure
that they are properly tightened. Should any of the
screws be loose, retighten them immediately. Fail-
ure to do so could result in serious hazard.
2. Cleaning of the charger
When the charger is stained, wipe with a soft dry
cloth or a cloth moistened with soapy water. Do not
use chloric solvents, gasoline or paint thinner, for
they melt plastics.
3. Store idle charger
When not in use, the charger should be stored in
dry, high or locked-up place–out of reach of children.
.
NOTE
Due to HITACHI’s continuing program of research and
development, the specifications herein are subject to
change without prior notice.
IMPORTANT
Correct connection of the plug
The wires of the mains lead are coloured in accordance
with the following code:
Blue: – Neutral
Brown: – Live
As the colours of the wires in the mains lead of this tool
may not correspond with the coloured markings identify-
ing the terminals in your plug proceed as follows:
The wire coloured blue must be connected to the terminal
marked with the letter N or coloured black.
The wire coloured brown must be connected to the termi-
nal marked with the letter L or coloured red.
Neither core must be connected to the earth terminal.
NOTE
This requirement is provided according to BRITISH
STANDARD 2769: 1984.
Therefore, the letter code and colour code may not be
applicable to other markets except United Kingdom.