


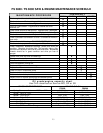


15
correct. Check the oil level frequently to
ensure that the level never falls below that
specified in the engine operation manual. If
the oil level is low, add SAE 10W30, service
classification SF or SG oil (for normal
conditions) as recommended in the engine
operation manual. DO NOT overfill engine
with oil!
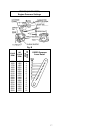
4. Operating Instructions
Preparing to Saw
1. Perform daily maintenance to saw
(see chart).
2. Fuel saw if required. Use good grade
of regular gasoline (14).
3. Remove blade guard and mount
blade securely on blade shaft. For
saws equipped with Magnalock
one-piece outer collar blade shaft,
insert the outer collar through the
blade and into the female inner collar.
Make sure the blade collars are
clean and free of nicks and burrs on
the clamping face. Make sure inner
collar is tight on the shaft and drive
key is in place. Check the drive pin in
the outer collar for damage, loose fit
or being bent. Check the blade arbor
for gouges, nicks or burrs. SAW
BLADE MUST BE HELD TIGHT AND
RUN TRUE to achieve the proper
blade performance.
4. If using wet cutting diamond blades,
visually inspect coolant spray tubes
for plugged or damaged openings.
Clean and repair as necessary.
Proper coolant flow is essential to
good blade performance.
5. Visually inspect blade guard for
cracks, hinge failure or loose
mounting. Repair or replace guard if
necessary. DO NOT USE SAW
WITHOUT BLADE GUARD
SECURELY IN PLACE!
6. Set line guides.
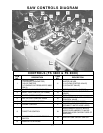
To Saw
1. Place water safety switch in the OFF
position.
2. Start engine and allow it to warm up
at half throttle. Observe proper oil
pressure and charging amps.
3. Set “Quick Stick” speed control
handle (2) to neutral and engage
transmission engagement lever (10).
4. Open throttle (5) to full speed
position. Engine governor is factory
set. DO NOT CHANGE SETTING
unless you have changed the saw
blade capacity to accommodate
larger or smaller diameter blades.
5. Turn on water to blade (8). Set water
safety switch to ON position (leave off
if dry cutting). If engine stops,
recheck water supply. The water
safety switch will automatically shut
off the engine if proper water
pressure is not supplied.
6. Position saw over cut.
7. Lower blade using toggle switch
located in speed control handle (2)
(follow instructions on handle).
Releasing switch will stop blade from
lowering. Stop lowering when blade
contacts pavement. With blade
touching pavement, set cutting depth
indicator (6) to “0”, then continue
lowering until the desired cutting
depth is shown on the cutting depth
indicator.
8. To use depth stop control (3) turn
handle clockwise until resistance is
met. For greater depth, turn handle
counter-clockwise, for lesser depth
turn the handle clockwise.
9. Move speed control handle (2)
forward SLOWLY until proper cutting
speed is achieved.
When Cut is Finished
1. Put speed control handle (2) back to
neutral position.
2. Raise blade from cut by using the
toggle switch in speed control handle.
When switch is released, the raise
will stop and hold in place.
3. Once the blade is completely out of
the cut, turn off water to blade (8).
4. Close throttle (8) to idle position. Let
engine cool down before stopping.
DO NOT STOP ENGINE AT FULL
THROTTLE!
NOTE: All sawing is done with engine at full
throttle. Engine governor is factory set to achieve
proper blade speeds and engine performance.
DO NOT CHANGE GOVERNOR SETTING
unless you are changing blade capacity
(Diameter).
Straight Line Sawing Adjustment
Your saw is equipped with rear axle adjustment to
adjust for blade lead off. The adjustment nut is
located at the back of the saw on the lower left
frame. To adjust saw, stop saw, stop forward
drive, remove blade from cut and stop engine.
Loosen rear axle mount bolts on left rear of saw.