


39
English
To turn the switch OFF, pull the trigger switch again
to disengage the stopper, and release the trigger
switch to its original position.
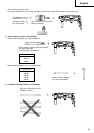
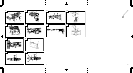
2. Rotation + hammering
This rotary hammer can be set to rotation and
hammering mode by pressing the push button and
turning the change lever to the
mark (Fig. 6).
(1) Mount the drill bit.
(2) Pull the trigger switch after applying the drill bit tip to
the drilling position (Fig. 7).
(3) Pushing the rotary hammer forcibly is not necessary
at all. Pushing slightly so that drill dust comes out
gradually is sufficient.
CAUTION
When the drill bit touches construction iron bar, the bit
will stop immediately and the rotary hammer will
react to revolve. Therefore grip the side handle and
handle tightly as shown in Fig. 7.
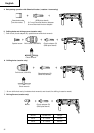
3. Using the dust-collecting adapter and dust bag
Using this unit with the dust-collecting adapter and
dust bag attached creates a more hygienic working
environment free of flying dust. Attach as shown in
Fig. 8. The unit can be used as an ordinary rotary
hammer when the dust-collecting adapter and dust
bag are not attached.
(1) Attaching the dust-collecting adapter and the dust
bag.
a) Attaching the dust-collecting adapter.
Loosen the knob on the side handle and insert the
attachment rod on the dust-collecting adapter in
the mounting hole.
The adapter can be inserted from either direction A
or B (see Fig. 9). Insert and push in the hose in the
hose attachment hole of the main unit until it
reaches the inner surface (depth 15 mm) and con-
firm that it is firmly fixed (see Fig. 10).
b) Attaching the dust bag.
Insert the dust bag firmly in the dust bag attach-
ment hole on the main unit and fasten securely (see
Fig. 11).
CAUTION
⅜ The dust-collecting adapter and dust bag is made
for use when drilling concrete. Do not use for
drilling holes in metal or wood.
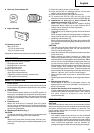
(2) Adjusting the dust-collecting adapter.
a) Adjusting the position of the dust-collecting adapter.
After firmly inserting the drill bit, loosen the wing
bolt and drill bit tip and the end of the dust-
collecting adapter in contact with each other (see
Fig. 12).
b) Setting the hole-drilling depth.
Move the stopper to determine the stroke. The
stroke is the hole-drilling depth (see Fig. 12).
⅜ The maximum hole-drilling depth when using the
dust-collecting adapter is 100 mm.
⅜ It is possible when using the dust-collecting adapter
to use HITACHI drill bits up to a overall length of 216
mm. A hole-drilling depth of 45 mm will allow dust-
collecting when the overall length of the drill bit is
116 mm.
(3) Drilling holes
When drilling holes, secure the main unit so that the
end of the dust-collecting adapter contacts with the
contrete surface perfectly during drilling. Dust-col-
lecting effectiveness is reduced if the adapter is not in
contact with the surface (see Fig. 13).
(4) Removing dust
Excessive dust in the dust bag will reduce dust-collect-
ing effectiveness. Remove dust from the dust bag
regularly.
Remove the dust bag from the main unit, pull out the
rail and throw away the dust and clean (see Fig. 14).
4. When not using the dust-collecting adapter
When removing the dust-collecting adapter and the
dust bag to use as a normal rotary hammer, insert the
provided cap in the hose attachment hole. (see Fig.
15). After removing the dust bag, the air blowing out
from the attachment hole is reduced and no air will
blow onto your face.
5. Rotation only
Remove the dust-collecting adapter as it cannot be
used. Insert the provided cap in the hose attachment
hole.
This rotary hammer can be set to rotation only
mode by pussing the push button and turning the
change lever to the
mark (Fig. 16).
To drill wood or metal material using the drill chuck
and chuck adapter (optional accessories), proceed
as follows.
Installing drill chuck and chuck adapter: (Fig. 17)
(1) Attach the drill chuck to the chuck adapter.
(2) The part of the SDS-plus shank is the same as the drill
bit. Therefore, refer to the item of “Mounting the drill
bit” for attaching it.
CAUTION
⅜ Application of force more than necessary will not only
expedite the work, but will deteriorate the tip edge of
the drill bit and reduce the service life of the rotary
hammer in addition.
⅜ Drill bits may snap off while withdrawing the rotary
hammer from the drilled hole. For withdrawing, it is
important to use a pushing motion.
⅜ Do not attempt to drill anchor holes or holes in concrete
with the machine set in the rotation only function.
⅜ Do not attempt to use the rotary hammer in the
rotation and striking function with the drill chuck and
chuck adapter attached. This would seriously shorten
the service life of every component of the machine.
6. When driving machine screws (Fig. 18)
First, insert the bit into the socket in the end of chuck
adapter (D).
Next, mount chuck adapter (D) on the main unit using
procedures described in 4 (1), (2), (3), put the tip of the
bit in the slots in the head of the screw, grasp the main
unit and tighten the screw.
CAUTION
⅜ Exercise care not to excessively prolong driving time,
otherwise, the screws may be damaged by excessive
force.
⅜ Apply the rotary hammer perpendicularly to the screw
head when driving the screw; otherwise, the screw
head or bit will be damaged, or driving force will not
be fully transferred to the screw.
⅜ Do not attempt to use the rotary hammer in the
rotation and striking function with the chuck adapter
and bit attached.
7. When driving wood screws (Fig. 18)
(1) Selecting a suitable driver bit
Employ plus-head screws, if possible, since the driver
bit easily slips off the heads of minus-head screws.