


English
11
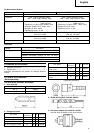
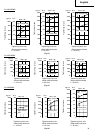
7. Bit adaptor: Code No. 322752 (WR12DM2)
This is used for tightening small screws (M6 – M8).
NOTE:
(1) This adaptor is set only on the anvil (drive angle) of
the main unit. The bit adapter cannot be attached to
the special accessory anvil (square drive).
(2) Before starting work with the adapter, tighten a few
screws with it to make sure it’s tightening with the
appropriate torque.
(3) Tightening speed will be greatly reduced when driving
wood, tapping or other similar screws.
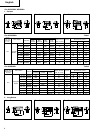
Optional accessories are subject to change without notice.
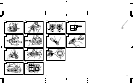
APPLICATION
< WH12DM2, WH9DM2, WH12DMR >
⅜ Driving and removing of small screws, small bolts,
etc.
< WR12DM2, WR9DM2 >
⅜ Tightening and loosening of all types of bolts and
nuts, used for securing structural items
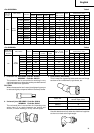
BATTERY REMOVAL/INSTALLATION
1. Battery removal
Hold the handle tightly and push the battery latch to
remove the battery. (See Fig. 1 and 2)
CAUTION:
Never short-circuit the battery.
2. Battery installation
Insert the battery while observing its polarities. (See
Fig. 2)
CHARGING
Before using the impact driver, charge the battery as
follows.
1. Connect the charger’s power cord to a receptacle.
When the power cord is connected, the charger’s
pilot lamp will blink in red. (At 1-second intervals.)
2. Insert the battery into the charger.
Insert the battery firmly, in the direction shown in
Fig. 3, until it contacts the bottom of the charger
compartment.
CAUTION:
⅜ If the battery is inserted in the reverse direction, not
only recharging will become impossible, but it may
also cause problems in the charger such as deformed
recharging terminal.
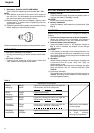
3. Charging
When inserting a battery in the charger, charging will
commence and the pilot lamp will light up
continuously in red.
When the battery becomes fully recharged, the pilot
lamp will blink in red. (At 1-second intervals.) (See
Table 5)
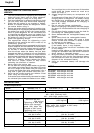
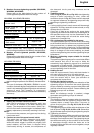
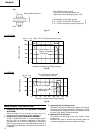
(1) Pilot lamp indication
The indications of the pilot lamp will be as shown in
Table 5, according to the condition of the charger or
the rechargeable battery.
Lights for 0.5 seconds. Does not light for
0.5 seconds. (off for 0.5 seconds)
Lights continuously
Lights for 0.5 seconds. Does not light for
0.5 seconds. (off for 0.5 seconds)
Lights for 0.1 seconds. Does not light for
0.1 seconds. (off for 0.1 seconds)
Lights continuously
Before
charging
While
charging
Charging
complete
Charging
impossible
Charging
impossible
Blinks
(RED)
Lights
(RED)
Blinks
(RED)
Flikers
(RED)
Lights
(GREEN)
Malfunction in the battery
or the charger
The battery temperature
is high, making
recharging impossible.
Table 5
Indications of the lamps