5
MAINTENANCE SECTION
a. Carefully heat alternate sides of the Housing until
it is very warm.
b. Using thick, heavy gloves to avoid being
burned, grasp the Housing and repeat the attempt
to dislodge the Cylinder.
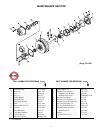
12. Remove the two Air Port Gaskets (14) and Gasket
supports (15) from the Housing.
ASSEMBLY
General Instructions
1. Always press on the inner ring of a ball–type bearing
when installing the bearing on a shaft.
2. Always press on the outer ring of a ball–type bearing
when pressing the bearing into a bearing recess.
3. Whenever grasping a tool or part in a vise, always use
leather–covered or copper–covered vise jaws. Take
extra care with threaded members and housings.
4. Always clean every part and wipe every part with a
thin film of oil before installation.
5. Apply a film of O–ring lubricant to all O–rings before
final assembly.
Assembly of the Motor
1. Press the Front Rotor Bearing (12) into the
recess at the hammer case end of the Motor Housing
(1).
2. Slide the Front End Plate (11), bronze face first, over
the spline hub of the Rotor (8).
3. Stand the assembled Rotor and End Plate upright,
grasping the rotor spline with leather–covered or
copper–covered vise jaws.
4. Place a Vane (9) in each slot in the Rotor.
5. Slide the Cylinder (10) down over the Rotor, aligning
the holes in the Cylinder with those in the Front End
Plate.
6. Using a sleeve that will contact only the outer ring of
the Rear Rotor Bearing (7), press the Bearing into the
Rear End Plate (6).
7. Using a sleeve that will contact only the inner ring of
the Rear Rotor Bearing, press the assembled Bearing
and End Plate onto the short hub of the Rotor.
Excessive clamping pressure will distort the Motor
Housing and make motor installation extremely
difficult. Do not insert the hammer case end of the
Motor Housing more than 1” (25 mm) into the vise
jaws.
8. Lightly clamp the Motor Housing in leather–covered
or copper–covered vise jaws with the motor bore
upward.
9. Lubricate and install a new fiber Gasket Support
(15) into each of the air ports inside the Motor Hous-
ing.
10. Install an Air Port Gasket (14) into each opening
against the Retainer with the flat end of the Gasket
away from the Retainer.
11. Using an assembly rod that is approximately 3/16”
diameter x 8” long (5 mm diameter x 203 mm long),
insert the rod through cylinder dowel holes in the End
Plates and Cylinder to align the components. Allow
the rod to protrude through the Front End Plate far
enough to enter the dowel hole in the bottom of the
motor bore.
12. Insert the rod into the motor housing dowel hole and
slide the assembled motor along the rod into the Mo-
tor Housing. The assembly will be at the proper depth
when the Rear End Plate is slightly below the face of
the Motor Housing. Remove the assembly rod and
insert the Cylinder Dowel (13) into the assembly.
13. Place the Motor Clamp Washer (5), concave side
first, over the hub of the Rear End Plate so that the
outer rim of the Washer contacts the End Plate.
14. Install the Seal (3) on the inside of the Back Cap.
15. Install Back Cap on Housing and secure with Cap
Screws (21) and Lock Washers (22). Tighten to
5–7 ft–lb (6.8–9.5 Nm) torque.
16. If Plugs (4) were removed or are being replaced,
apply pipe thread sealant and tighten to 10–20 ft–lb
(13.5–27 Nm) torque.


