


NORMAL START-UP
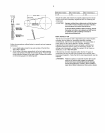
1 Set the pressure switch lever to "OFF"
2 Close the service valve
3 Attach hose and accessory
4., Move the pressure switch lever Io "ON/AUTO _ The coil will start
5. Allow tank pressureto build The motor will stop when tank pressure
reaches cut-out pressure,
6 Open the service valve The unit is now ready for use.
NOTE When the receiver tank pressure drops below the
factory pro-set minimum, the pressure switch resets
and restarts the unit,
WHEN YOU ARE FINISHED:
1 Set the pressure switch lever to "OFF"
2 Close the service valve fully
3 Remove the air loci er accessory
4 Slowly open the serv[ce valve to bleed air pressure down Io 20 psig
5 Slowly open the manual drain valve at the bottom of the tank ta
drain all condensate (water).,
6 Close the drain valve and the service vaIve for the next use
i I II'llI' ' I' '11I'lll'l
WARNING
NOTE
NOTE
Disconnect. lock and tag the main power supply and
release air pressure from the system before
performing maintenance.,
All compressed air systems contain maintenance
parts (e g, lubricating oil, filters, separators) which
are periodically replaced,. These used parts may be,
or may contain, substances that are regulated and
must be disposed of in accordance with local, state,
and federal laws and regulations.
Take note of the positions and locations of parts
during disassembly to make reassembly easier., The
assembly sequences and parts iliusfrated may differ
for your particular unit,,
Any service operations not included in this section
should be performed by an authorized service
representative.
NOTE
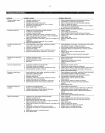
Dally or Before •
Eacl_ Operation •
Week{y •
Monthly Q
O
3!500 * •
12/2000 * •
ROUTINE MAINTENANCE SCHEDULE
Check lubricant leve_ Fil_ as needed
Drain receiver tank condensate Open the
manual drain vaive and cofiect and dispose of
condensate accordingly
• Check for unusual noise and vibration
• Ensure beltguards and covers are securely in
place
• Ensure area around compressor is free from
rags, tools, debris, and flammable or
explosive materials
Inspect air filter element Clean or replace if
necessary.
Inspec| for air leaks Squirt soapy water
around joints during compressor operation
and watch for bubbles
Check tightness of screws and botts,, Tighten
as needed
Clean exterior
Change petroleum lubricant while crankcase
is warm
Change synthetic lubricant while crankcase is
warm,
Replace filter element
" Indicates monthslopar_tlng hours, whichever occurs first;
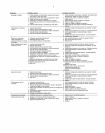
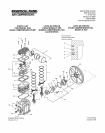
FILTER REPLACEMENT (SS3)
1. Unscrew and remove the wing nut (A)
2. Remove the filter cover (B), baffle (C) and e_ement (D) from the
base (E)
3,, install a new efement and reassemble the filter assembly
NOTE The air intake holes in the baffle and cover must be
staggered t80 _. When reinstalling the assembly at
the inlet connection, ensure the intake hole in the
cover is on the bottom to minimize the entry of
foreign matter from the air
_J
FILTER REPLACEMENT (SS5)
1,, Unscrew and remove the wing nut (A) secudng thefitter housing (B)
to its base (C)
2., Remove the filter housing and withdraw lhe old fitler element (D)
Clean the elemen! wilh a jel of air or vacuum
3. Replace the f_ltarelement and housing, securing it in place with the
wing nut previously removed
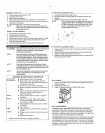
OIL CHANGE
t. Remove the oil drain plug (A) and allow lhe lubricant 1o drain intoa
suitable container
2. Replace the oil dra_n plug
3. Follow the filfing procedures in OPERATION section
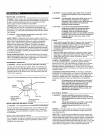
BELT ADJUSTMENT
CHECKING BELT TENSION Check bell tension occasionaf!y,
especially if looseness is suspected A quick check !o delermine if
adjustment is proper may be made by observing the stack side of
the bait for a slight bow when the unit is in operation if a slight bow
is evident, the belt is usuaily adjusted satisfactorily
TENSIONING BELTS Belt tensioning can be achieved by loosening
the motor anchor screws, pushing the motor away from the pump,
and reiightening tt_e motor anchor screws The motor can be easily
moved by placing a prying toot beneath it. A commercially available
spreader or other belt tensioning device can also be helpS'u1should
tensioning be necessary,