ld :(0] II :| II:l"l_'[*Ia]l dI_[{glm m,_
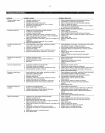
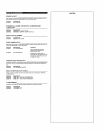
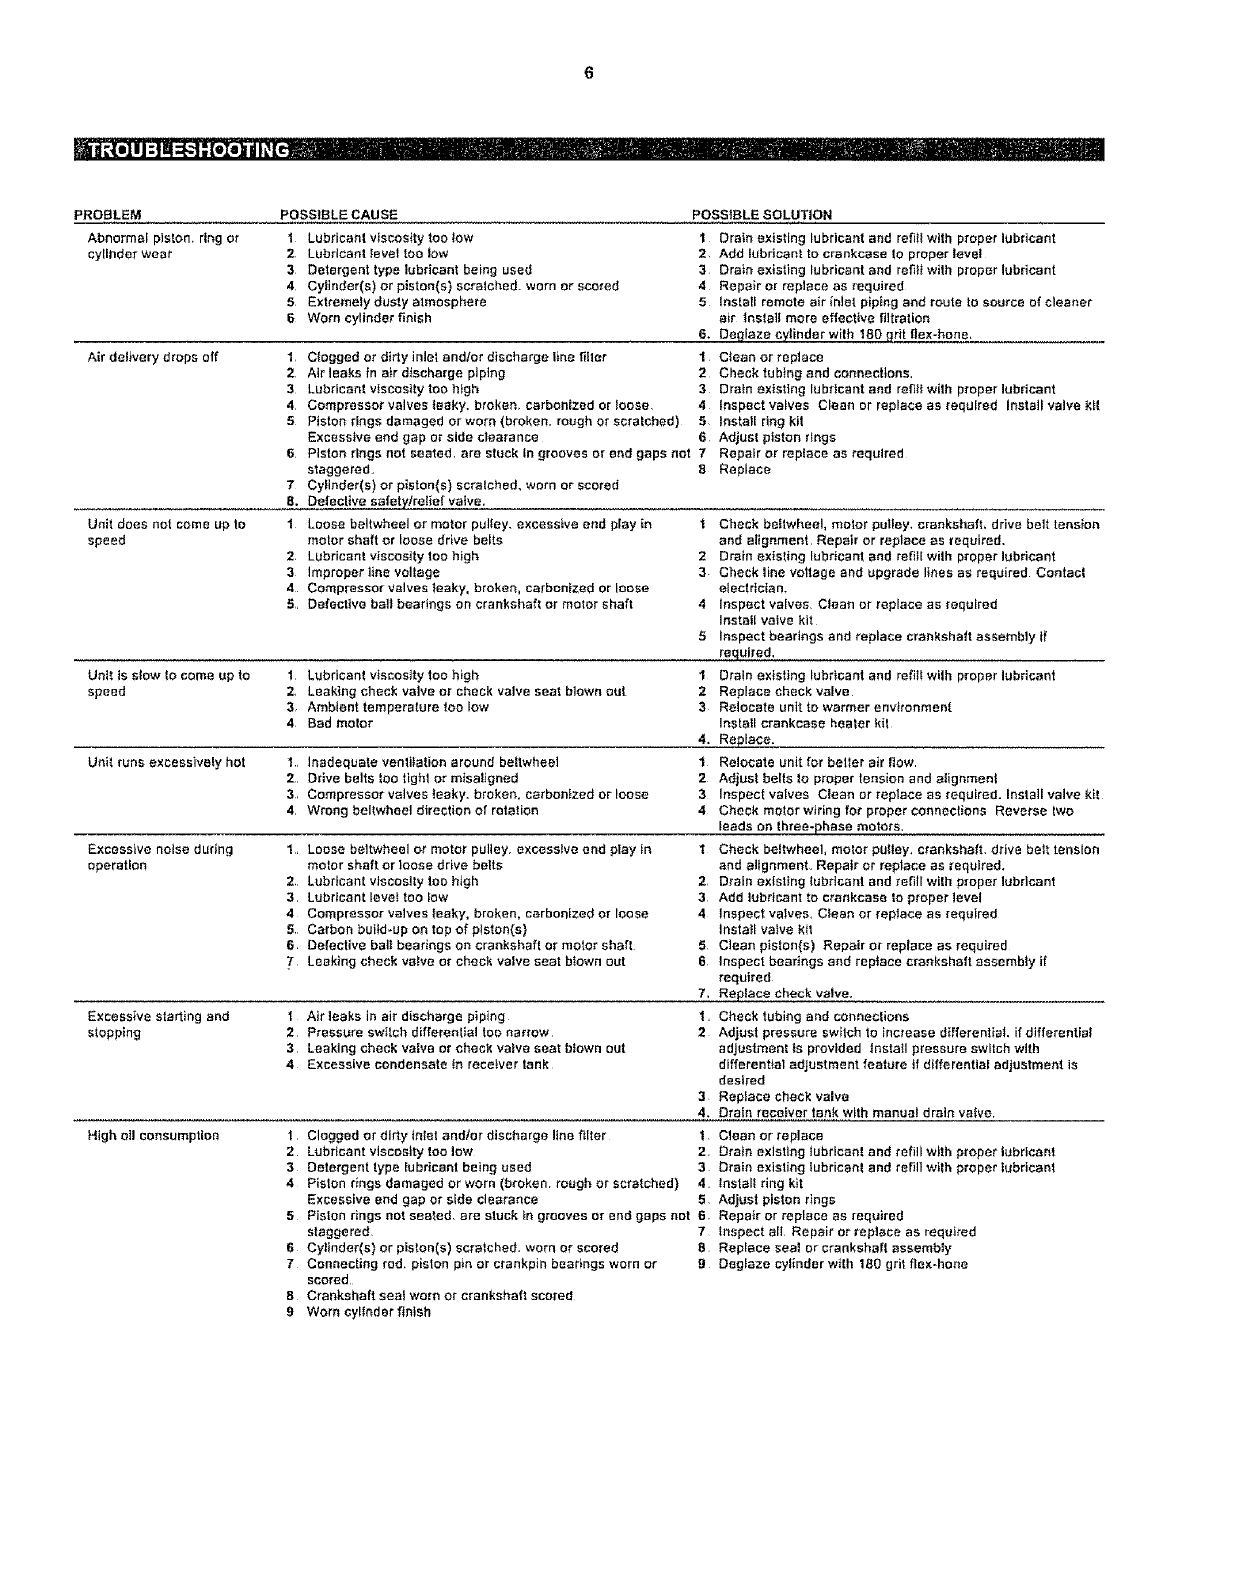
PROBLEM POSSIBLE CAUSE
Abnormal piston, ring or 1 Lubricant viscosity too tow
cylinder wear 2 Lubricant level too law
3 Detergent type lubricant being used
4 Cylinder(s) or piston(s) scratched, worn or scored
5 Extremely dusty atmosphere
6 Worn cylinder finish
Air delivery drops off
U_it does not come up to
speed
Unit ts slow Io come up to
speed
Unit runs excessively hot
Excessive noise durtng
operation
Excessive starting and
stepping
High ellconsumption
1 Ctogged or dirty inlet and/or discharge line fitter
2 Atr leaks tn air discharge piping
3 Lubricant viscosity too high
4 Compressor valves leaky, broken, carbonized or Ioose.
5 Piston rings damaged or worn (broken. rough or scratched)
Excessive end gap or side clearance
6 Piston rings not seated, are stuck In grooves or end gaps not
staggered,
7 Cylinder(s) or piston(s) scratched_ worn or scored
8. Defective safety/relief vatve.
1 Loose beltwheel or motor pulfey, excessive end play in
motor shaft or loose drive belts
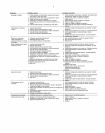
2. Lubricant viscosity tea high
3 Improper line voltage
4 Compressor valves leaky, broken, carbonized or loose
S, Defective bait bearings on crankshaft or motor shaft
1 Lubricant vtscosttytoo high
2, Leaking check valve or check valve seat blown out
3, Ambient temperature too low
4 Bad motor
1, Inadequate venlilation around bettwheel
2 Drive belts Ioo tight or misaligned
3, Compressor valves leaky, broken, carbonized or loose
4, Wrong beltwheel direction of rotation
1, Loose beltwheel or motor pulley, excessive and play In
meter shaft or loose drive belts
2, Lubricant viscosity too high
3, Lubricant level too few
4 Compressor valves leaky, broken, carbonized or loose
5, Carbon build-up on top of piston(s)
6, Defective ball bearings on crankshaft or motor shaft
.7 Leaking check valve or check valve seat blown out
t Air leaks te ai_rdischarge piping
2 Pressure switch differential too narrow
3 Leaking check valve or check valve seat blown out
4 Excessive condensate tn receiver tank
t Clogged or dirty inlet and/or discharge llne triter
2 Lubricant viscosity toolow
3 Detergent type lubricant being used
4 Piston flags damaged or worn (broken. rough or scratched)
Excessive end gap or side clearance
5 Pislon rings not seated, are stuck tn grooves or end gaps not
staggered
6 Cylinder(s) or piston(s) scratched, worn or scored
7 Connecting red, piston pin or crankpin bearings worn or
scored
B Crankshaft seat worn or crankshaft scored
9 Worn eytinderftnish
POSSIBLE SOLUTION
1 Drain existing lubricant and refill with proper lubricant
2, Add lubricant to crankcase to proper levet
3 Drain existing lubricant and refill with proper lubricant
4 Repair or replace as required
5 Install remote air inlet piping and route to source of cleaner
air Installmore effective filtration
6. Det'_leze cylinder with 180 grit flex-hone,
1 Clean or reptace
2 Check tubing and eonnecttonm
3 Drain existing lubricant and refIlf with proper lubricant
4 tnspect valves Clean or replace as required Installvalve kit
5 Install ring kit
6 Adjust piston rings
7 Repair or replace as required
8 Replace
t Check beflwheel, motor pulley, crankshaft, drive bett ter_sSen
and alignment, Repair or replace as required,
2 Drain existing lubricant and retill wilh proper lubricant
3. Check line voltage and upgrade lines as required Contact
electrician.
4 Inspect valves, Clean or replace as required
Install valve kit
5 Inspect bearings and replace crankshaft assembly If
required,
I Drain existing lubricant end refiltwith proper lubricant
2 Replace check valve
3 Relocate unit to warmer environment
Install crankcase healer kit
4. _lace.
1 Relocate unit for belier air now
2 Adjust belts to proper tension and alignment
3 Inspect valves Clean or replace as required, Install valve kit
4 Cheek motor wiring for proper connections Reverse two
leads on three-phase motors.
t Check beltwheal, motor pulley, crankshaft, drive belt tension
and alignment Repair or replace as required,
2 Drain existing lubricant and refill wilh proper lubricant
3 Add lubricant to crankcase 1oproper level
4 Inspect valves, Clean or replace as required
Install vatve kit
5 Clean piston(s) Repair or replace as required
6 Inspect bearings end replace crankshaft ascambly if
required
7. Replace check valve,
1 Check tubing and connections
2 Adjust pressure switch to increase differential if differential
adjustment ls provided tnstatl pressure switch with
differential adjustment feature tfdifferential adjustment is
desired
3 Replace cheek valve
4. Drain receiver tank with manual drain valve,
1 Clean or replace
2, Drain existing lubricant and refill w_thproper lubricant
3 Drain existing lubricant and refill with proper lubricant
4 Install ring kit
5, Adjust piston rings
6 Repair or replace as required
7 Inspect all Repair or replace as required
8 Replace seal or crankshaft assembly
g Deg_aze cylinder wlth 180 grit flex-hone


