


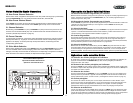
MSR4115
4
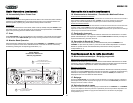
Dashboard
Mounting Paper
Mounting
Location
Template
Mounting
Hole
Templates
Mounting
Screws
M
S
R
4
1
1
5
5
0
W
X
4
P
U
L
L
O
P
E
N
C
D
W
E
A
T
H
E
R
R
E
C
E
IV
E
R
P
O
W
E
R
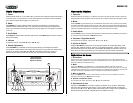
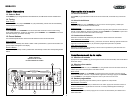
CHANNEL
S-MOD
S
H
IF
T
/S
C
A
N
V
O
L
V
O
L
S
E
L
M
E
N
U
C
A
T
E
G
O
R
Y
D
IM
M
O
D
E
E
J
E
C
T
DISP
LOUD
B
A
N
D
A
S
/P
S
E
N
T
E
R
ELAPSE
/P
S
C
A
N
M
U
T
E
1
2
3
4
5
6
7
8
9
0
M
E
M
P
G
M
R
P
T
R
D
M
IN
T
Panel Gasket
Dashboard
Instalación
Desconexión de la Batería
Antes de empezar, apague la ignición y desconecte el terminal negativo de la batería.
Remoción de Tornillos
Quite los dos tornillos de la parte superior de la unidad, y selle los agujeros con el film plástico
provisto para evitar que ingrese agua en la unidad.
Instalación de la Unidad
1. Anexe al tablero el papel de montaje provisto en la ubicación de montaje deseada.
2. Cuidadosamente corte y quite una sección rectangular del tablero utilizando como plantilla la
apertura rectangular en la parte interior del papel de montar.
3. Taladre cuatro agujeros para el montaje, utilizando como plantilla los cuatro agujeros en las
esquinas del papel de montaje.
4. Utilizando el papel engomado provisto, anexe las dos ménsulas de montaje a la parte trasera del
tablero, cuidando de alinear los agujeros para tornillos de las ménsulas con los agujeros de
montaje en el tablero.
5. Abra las dos secciones de goma, cubriendo los lados izquierdo y derecho de la faz del radio para
revelar las aberturas para tornillos. Ubique el empaque de la junta entre la unidad y el tablero, y
utilice los cuatro tornillos provistos para montar la unidad seguramente al tablero.
Nota: Se deben seguir con precisión las instrucciones de instalación para asegurar que la
unidad mantenga los estándares de impermeabilidad IPX5.
Installation
Débrancher la pile
Avant de commencer, éteignez l'allumage du véhicule et débranchez la borne négative de la pile
Enlever les écrous
Enlevez les deux écrous du dessus de l'appareil et boucher les trous avec du film en plastique
fourni pour assurer que l'eau n'entre pas dans l'appareil.
Installation de l'appareil
1. Fixez le papier de montage fourni au tableau de bord dans l'emplacement de montage désiré.
2. Coupez et enlevez une section en forme rectangulaire du tableau de bord, en utilisant l'ouverture
rectangulaire à l'intérieur du papier à montage comme modèle.
3. Percez quatre trous de montage en utilisant les quatre trous aux coins du papier à montage
comme modèle.
4. En utilisant le papier adhésif fourni, fixez les deux équerres de montage au dos du tableau de
bord, en prenant soin d'aligner les trous des équerres avec les trous de montage sur le tableau de
bord
5. Ouvrez les deux sections de couverture en caoutchouc à droite et à gauche de la face de la radio
pour révéler les ouvertures pour les écrous. Positionnez le joint statique du panneau entre
l'appareil et le tableau de bord et utilisez les quatre écrous fournis pour monter l'appareil d'une
manière sûre sur le tableau de bord.
Note : Les instructions d'installations doivent être suivies avec précision pour assurer
que l'appareil maintient les standards IPX5 d'étanchéité.
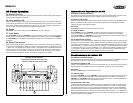
Installation
Disconnect Battery
Before you begin, turn off the vehicle ignition and disconnect the battery negative terminal.
Remove Screws
Remove the two screws from the top of the unit, and seal the holes with the plastic film provided
to ensure that no water is able to enter the unit.
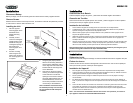
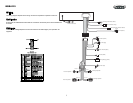
Installing the Unit
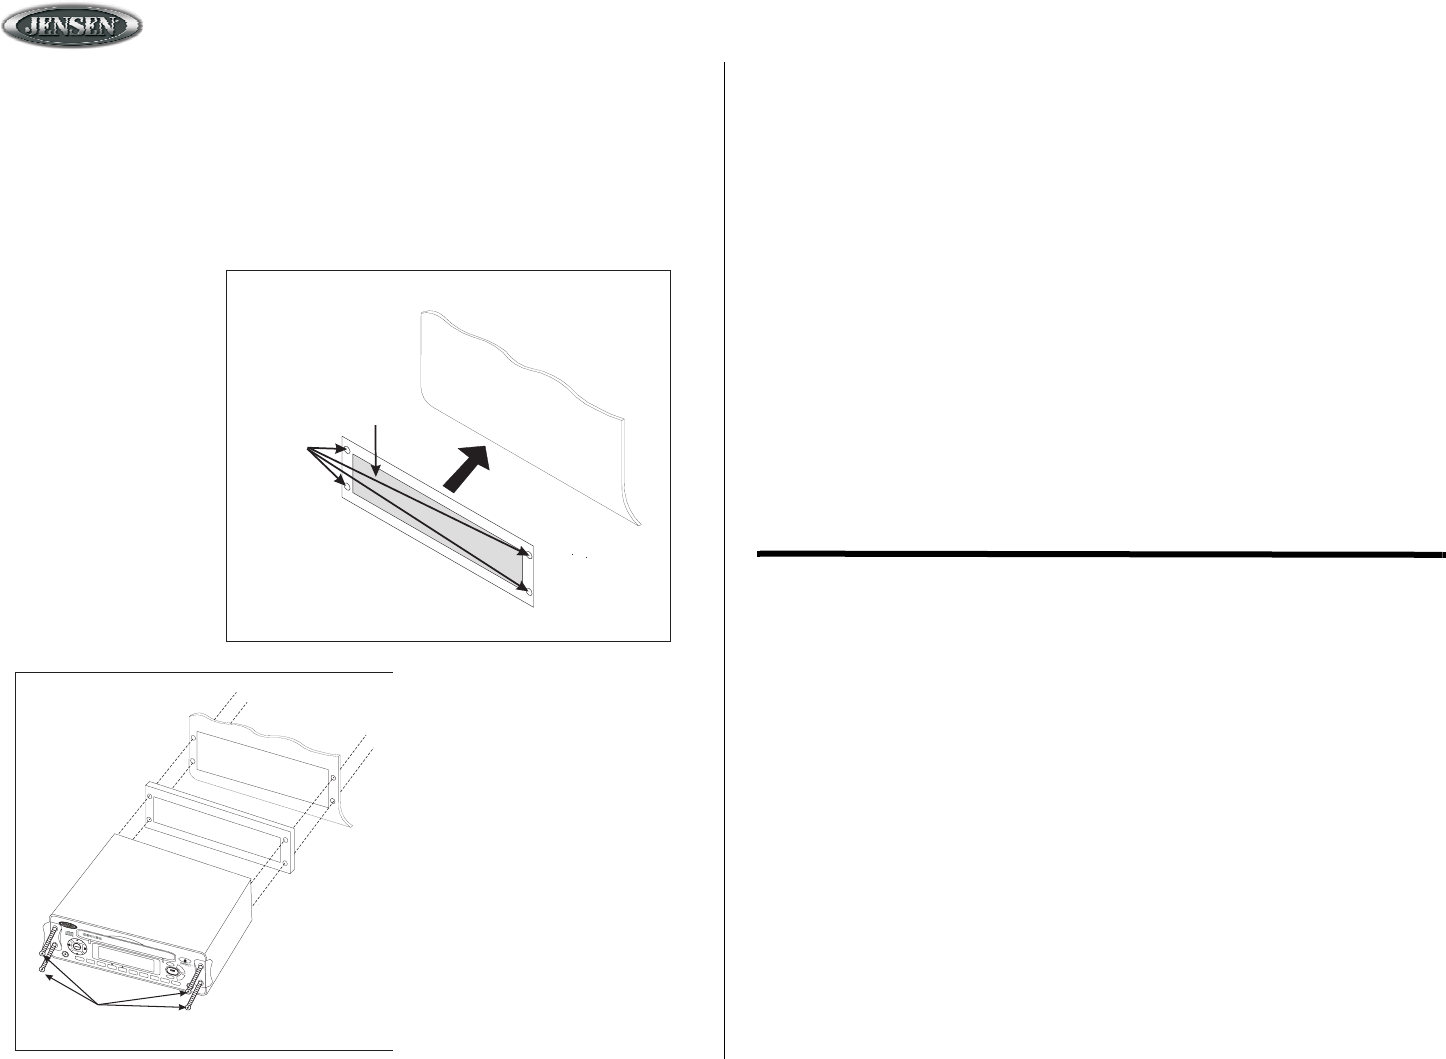
1. Affix the supplied
mounting paper to the
dashboard in the
desired mounting
location.
2. Carefully cut and
remove a rectangular-
shaped section of the
dashboard using the
rectangular opening on
the inside of the
mounting paper as a
template.
3. Drill four mounting
holes using the four
holes in the corners of
the mounting paper as
a template.
4. Using the glue paper provided,
affix the two mounting brackets to
the back of the dashboard, taking
care to align the screw holes of the
brackets with the mounting holes
on the dashboard.
5. Open the two sections of rubber
covering on the left and right sides
of the radio face to reveal the
openings for the screws. Position
the panel gasket between the unit
and the dashboard, and use the
four screws provided to mount the
unit securely to the dashboard.
Note: Installation instructions must
be followed precisely to ensure that
the unit maintains IPX5 waterproof
standards.