


8
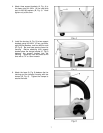
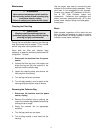
7. Slide the bag hanger hook (A, Fig. 7)
through the top loop of the filter bag. Insert
the hanger into the hanger bracket. Thread
the retainer strap (B, Fig. 7) through the
loops on the filter bag (C, Fig.7), and fasten
to the collector housing. The retainer strap
should be tight enough to provide a good
seal.
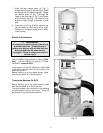
8. Insert the ring (A, Fig. 8) of the collector bag
into the bottom of the housing at an angle.
Pull down on the bag to make sure it “seats”
in the housing.
Electrical Connections
WARNING
All electrical connections must be done by a
qualified electrician. All adjustments or
repairs must be done with the dust collector
disconnected from the power source,
unplugged. Failure to comply may result in
serious injury!
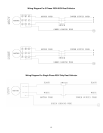
The DC-1200A-1 dust collector is rated at 230V
Only. The DC-1200A-3 is rated at 3 Phase
230V/460V, Prewired 230V.
If you want to run the DC-1200A-3 on 460V refer
to the wiring diagram found on the inside of the
switch box cover.
Before hooking up to the power source, make
sure that the switch is in the off position.
Turning the Machine On & Off
Before hooking up to the power source, make
sure that the switch is in the off position.
The dust collector can be turned on by pressing
the start button found on the motor. Press the
stop button to turn off the dust collector.