14
Test cuts can be used to determine whether or not you
have adjusted the blade accurately. Use 2-inch round
bar stock to perform these test cuts, as follows:
1. With the bar stock securely clamped in the vise,
make a cut through the bar stock. (See figure 14.)
2. Mark the top of the bar stock.
3. Move the bar stock about 1/4-inch past the blade
so you can begin a second cut.
4. Rotate the bar stock 180 degrees so the mark you
made is now at the bottom of the cut.
5. Make a cut through the bar stock.
6. Use a micrometer to measure the thickness
variation of the disk you have cut from the bar
stock. Measure at the top and bottom of the disk.
The saw blade can be considered correctly ad-
justed when the variation measure is no more than
0.012 inch across the face of the disk.
Note: If you do not have a piece of 2-inch bar stock
available for a test cut, use a larger diameter test
piece rather than a smaller one. Maximum thickness
variation on any test piece should be no more than
0.003 inch, per side, per inch of stock diameter.
Adjustment of Limit Switches
Adjustment of Lower Limit Switch
1. The lower limit switch is provided to shut off the
saw blade drive motor when the workpiece is cut
through. The switch causes the saw head to raise
to its uppermost stop.
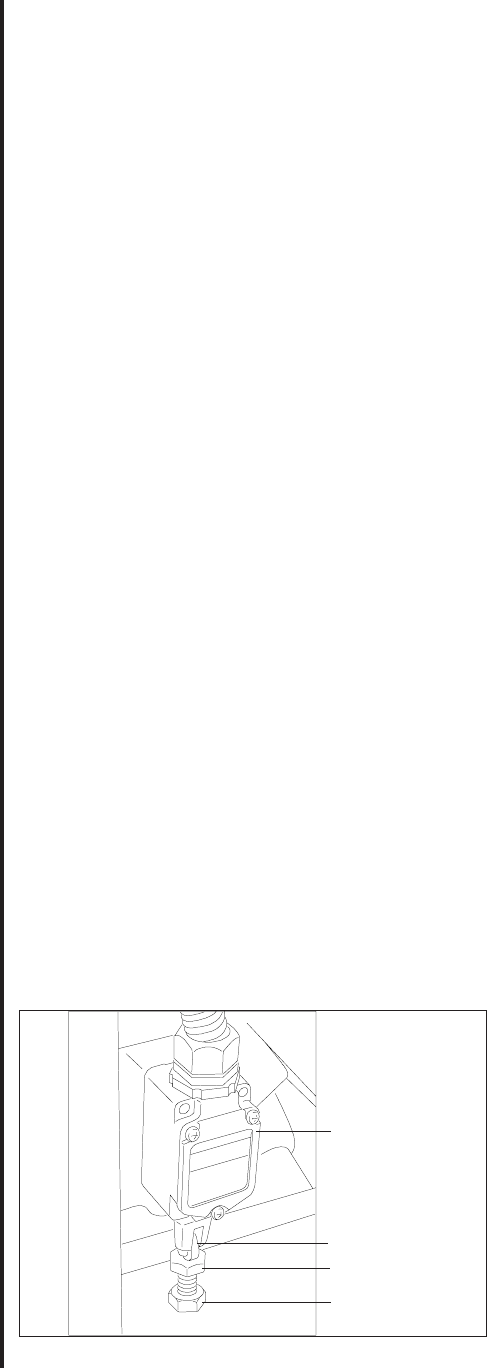
2. To set the limit switch, loosen the jam nut on the
limit switch stop (figure15).
3. Adjust the stop as required and retighten jam nut.
Adjustment of Upper Limit Switch
1. The upper limit switch is provided to stop the saw
head when it reaches its uppermost stop.
2. To set the upper limit switch, loosen the clamping
knob on the limit switch support bracket. Move the
limit switch to the desired switch trip point (use the
scale on the side of the support bracket).
(see exploded figure, page 20).
5. Lead screw: lubricate with light oil monthly (see
exploded figure, page 20).
6. Hydraulic cylinder pivot: lubricate with light oil
every 6 months (see exploded figure, page 20).
7. Blade tension screw: lubricate with grease every
6 months (see exploded figure, page 24).
8. Blade brush bearing: lubricate with light oil
monthly (see exploded figure, page 24).
9. Gear box: check oil once a year.
10. Change coolant on a frequency appropriate to
the type of coolant being used. Oil based
coolants can sour. Refer to the coolant supplier’s
instructions for change frequency.
11. Coolant tank: clean every 6 months or as re-
quired.
12. Hydraulic oil reservoir: check oil level in oil
reservoir by periodically checking the oil level
indicator on the side of the reservoir. If oil level
is low, service reservoir (refer to Servicing
Hydraulic Oil).
Maintenance
Cleaning
1. Clean off any preservative on machine surfaces.
2. After cleaning, coat the machined surfaces of the
cut-off saw with a medium consistency machine
oil. Repeat the oil coating process at least every
six months.
3. Clean up accumulated saw cuttings after use.
Make sure the lead screw is kept free of saw
cuttings and other material that would cause
damage.
4. Clean the chip sludge from the coolant tank. The
frequency should be determined by how often the
saw is used.
Lubrication
Lubricate the following components at the specified
frequencies and using the lubricants defined below:
1. Ball bearings: the bearings are lubricated and
sealed—periodic lubrication is not required.
2. Blade guide bearing: the bearings are lubricated
and sealed—lubrication is not required. Inspect
periodically.
3. Idler wheel bushing: the bearings are lubricated
and sealed—lubrication is not required. Inspect
periodically.
4. Lead screw bearing housing: lubricate monthly
Figure 15: Lower Limit Switch Stop Adjustment
Lower Limit Switch
Switch Follower
Lower Limit Stop
Jam Nut


