


11
9. With the aid of a second person, carefully lift
the head onto the column top. Caution:
The head assembly is heavy! Use care
when lifting onto the column!
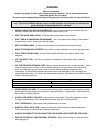
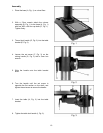
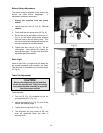
10. Rotate head assembly until sides of the belt
cover are parallel with the sides of the base.
11. Tighten two set screws (A, Fig. 4) with a
5mm wrench until they are snug.
12. Install three down feed handles (B, Fig. 4)
into the down feed hub (C, Fig. 4).
13. Raise table to approximately seven inches
below spindle assembly, and lock the table
in place.
14. Place a piece of scrap wood on the table.
15. Thoroughly clean spindle, arbor, and chuck.
Important: These three pieces must be
free of any rust protection, or lubricant. If
they are not clean, the arbor and chuck will
fail to seat in the spindle.
16. Place arbor into the chuck.
17. Twist the chuck to retract the chuck jaws if
they are exposed.
18. Place arbor and chuck assembly into the
spindle.
19. Turn the arbor and chuck assembly until the
tang on the arbor engages the slot at the
end of the spindle.
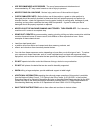
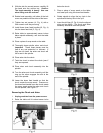
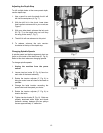
20. Lower the down feed handle so that the
chuck meets the scrap wood. Pressure on
the down feed handle once the chuck meets
the scrap wood seats the arbor and chuck
into the spindle, See Figure. 5.
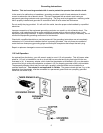
Removing the Chuck and Arbor
1. Unplug machine from the power source.
2. Raise the table until it is about seven inchs
below the chuck.
3. Place a piece of scrap wood on the table,
and lower quill using the down feed handle.
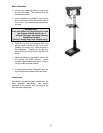
4. Rotate spindle to align the key hole in the
spindle with the key hole in the quill.
5. Insert the drift key (D, Fig. 6) into the aligned
slots and tap lightly. The chuck and arbor
assembly should fall from the spindle.