


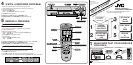

SITUATE AND CONNECT YOUR
NEW VCR
2
2
PLUG & PLAY
3
3
SET YOUR VCR'S CLOCK AND
TUNER
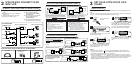
1 Place the VCR on a stable, horizontal
surface.
2 Disconnect your antenna or cable line
from your TV.
3 Connect your antenna to your VCR.
4 Connect your VCR to your TV.
Ⅲ Antenna Splitter Ⅲ Antenna Splitter
Ⅲ VHF/UHF Antenna MixerⅢ RF Cable Ⅲ 300-75 ohm Matching
Transformer
● CONNECTORS WHICH ARE OR MAY BE REQUIRED:
CABLE TV LINE
Note:
Exact connector positions and names may differ.
ANTENNA IN
TV OUT
VHF/UHF
VHF
VHF
UHF
UHF
UHF ONLY
VHF ONLY
SEPARATE VHF/UHF
COMBINED VHF/UHF
Back of VCR (example only) Back of TV (example only)
RF CONNECTION
5 After completing the basic connections:
● If you’re using a Cable Box, . . .
. . . go to 2b (CATV CONVERTER
CONNECTION) .
● If you’re using an AV connection, . . .
. . . go to 2c (AUDIO/VIDEO
CONNECTIONS).
● If you’re using an RF connection only, . . .
. . . go directly to 3 (PLUG & PLAY).
INOUT
ANTENNA IN
TV OUT
CATV Input
From
Cable
Box
To TV
Cable
Box
TV
VCR
With this connection you can view/record any
cable channel including scrambled channels to
which you have subscribed.
INOUT
ANTENNA IN
TV OUT
CATV Input
From VCR
Cable
Box
To TV
TV
VCR
With this connection, you can view one
scrambled cable channel while recording
another unscrambled channel.
To watch TV with this type of connection
1
Press TV/VCR on the Remote so that the VCR
mode indicator lights on the front display
panel.
2 Tune TV to VCR output channel
(3, 4 or AV mode).
3 Tune VCR to Cable Box output channel.
4 Select desired channel on Cable Box.
•You can only view the channel you are
recording.
To watch TV with this type of connection
1
Press CH 5∞ (+/–) or Number keys to select
desired channel for recording.
2 Press TV/VCR so that the VCR mode indicator
goes off from the front display panel.
3 Tune TV to Cable Box output channel.
4 Select desired channel on Cable Box.
• You cannot record scrambled channels.
• To play back a tape, you must tune the
Cable Box to the VCR output channel.
To Listen To VCR Sound Through A
Component Stereo Audio System,
Connect As Shown
AV connection methods differ from one type
of VCR to another. First, for any TV and VCR,
connect your VCR to your TV using RF
connection. Then make AV connections
following one of the methods illustrated here.
After making the connections, go to 3
(PLUG
& PLAY)
.
MONAURAL VHS VCR Ł AV TV
VIDEO OUT
AUDIO OUT
VIDEO IN
AUDIO IN
SUPER VHS VCR Ł AV STEREO TV WITH S-VIDEO
INPUT TERMINALS
VIDEO IN
S-VIDEO IN
VIDEO OUT
S-VIDEO OUT
R
AUDIO INAUDIO OUT
L
R
L
Hi-Fi VHS VCR Ł AV STEREO TV
VIDEO INVIDEO OUT
R
AUDIO INAUDIO OUT
L
R
L
AMP
VIDEO OUT
AUDIO OUT
R
L
VCR
TV
Monaural deck owners:
Connect to VCR's AUDIO
OUT
The VCR’s clock and tuner channels are set automatically when the VCR is plugged into the AC
outlet.
If you use a cable box, Plug & Play will not function; set the clock and tuner channels separately.
(
੬ pg.10 – 14 of the HR-S4800U/HR-S3800U’s instruction manual)
1
Plug the VCR into the
AC outlet.
2
Do not press any buttons on the VCR or on the
Remote during Auto Setup.
3
“AUTO” blinks while the VCR automatically
sets the clock using information provided by
the local PBS channel.
NOTES:
● If the clock time displayed in is incorrect, perform the Semiauto or Manual Clock Set
procedure (refer to page 11 or 12 of the HR-S4800U/HR-S3800U’s instruction manual). Auto
Channel Set has already taken place, and is not affected.
● There are some PBS channels that do not transmit clock setting data. If your antenna cable is
properly connected and “– – : – –” is displayed, perform the Manual Clock Set procedure (refer
to page 12 of the HR-S4800U/HR-S3800U’s instruction manual). Auto channel setting has not
yet taken place, so perform the Auto Channel Set procedure (refer to page 13 of the HR-
S4800U/HR-S3800U’s instruction manual).
5
4
During Auto Channel Set, the channel numbers
are displayed as they are scanned and set.
Receivable channels are automatically stored
in memory in the order of their frequencies,
and non-receivable channels are skipped.
5
When setting is complete, the VCR displays the
current clock time. You can now use your
VCR.
a–BASIC ANTENNA/CABLE CONNECTION
b–CATV CONVERTER CONNECTION
c–AUDIO/VIDEO CONNECTIONS