


Easy Start up Guide
This easy start up guide is designed to navigate you
to using your new Everio quickly. Please refer to the
owner’s manual for a detailed listing of features.
For our online tutorials please visit:
http://camcorder.jvc.com/tutorials.jsp
JVC Company of America
A Division of JVC Americas Corp.
1700 Valley Road, Wayne, NJ 07470
www.jvc.com
Customer Service
TOLL FREE: 1-800-252-5722
For our online tutorials please visit:
http://camcorder.jvc.com/tutorials.jsp
Register your EVERIO online at:
REGISTER.JVC.COM
and receive a special offer.
LYT1962-001A
0608MKH-AL-OT
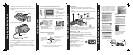
File Backup
Playing Your Memories on a TV
1) Connect camera to PC using the USB cable.
2) Open the LCD monitor to turn on the camera.
1) After connecting USB to and AC adapter to camera and PC
open LCD to turn camera on.
2)
On the camera: press DIRECT BACK UP
and PowerCinema will start.
3) On the PC: fi le copy starts.
When the progress bar disappears,
the process is complete.
Direct Backup
File Backup (PC and Mac) without using software
3) Create a folder to backup
up fi les into.
4) On the camera: move
the set lever to select
Playback on PC then
press down the set lever.
5) On the PC: double click
EVERIO_HDD or
EVERIO_SD
6) Select the folder that you
want to backup. Drag and
drop it in to the folder you
created in (step 3).
AVCHD: This folder contains all your video fi les in AVCHD format.
SD_VIDEO: This folder contains all your video fi les in MPEG-2 TS format.
(GZ-HD40/30 only).
DCIM: This folder contains all your still images.
Preparation:
Turn off both camera and TV.
1) Plug in the optional HDMI
cable to the camera and the
TV.
2) Turn on the camera and the
TV.
3) Slide the mode switch
to select Video or Still
Image Mode
4) Press the PLAY/REC
button to put the
camera in playback
mode.
PLAY/REC
SELECT
5) Move the set lever to select
the desired thumbnail for video
or still image playback. Then
press down the set lever.
HDMI Connector
AC Adapter DC Connector
HDMI Connector
HDMI Cable (optional)
To AC Outlet
<NOTE>
•
When connecting to a 1080p compatible TV, set [HDMI
OUTPUT] to [AUTO1]. When this is set, 1080p appears at
the top of the display.
•
When the video was recorded with x.v.Color™ set to [ON],
change the x.v.Color™ setting on TV. For details, refer to
the TV’s instruction manual.
VIDEO
1/1
SELECT
SET SORT
Select
Set