


_____________________________________________________________
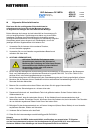
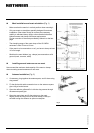
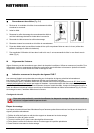
Connection of the cable (Fig. 3-4)
1. Unscrew the knurled screw on the cable connection box and
lift the cap
2. Skin the cable
3. Open the cable connection clamp and the strain relief clamp
in the cap
4. Connect the cable and tighten the clamps
5. Screw the cap on the connection box
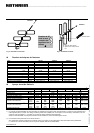
6. Lay the cable according to the local conditions so that it cannot flutter in the wind and chafe (use either cable
clamps or cable ties or insulating tape)
7. In order to avoid ingress of moisture in the mast or brickwork, make a 'water sack' with the cable (Fig. 4)
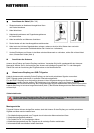
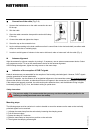
Antenna alignment
Align the antenna for optimum reception by turning it. If necessary, use an antenna measurement device. Select
any programme on the TV set or the measurement device for the antenna alignment.
After finishing the alignment, tighten the wing screws on the mast clamp.
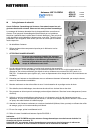
Indication of the reception of DVB-T signals
Kathrein antennas are pre-assembled for the reception of horizontally polarised signals. However, DVB-T signals
are also transmitted in vertical polarisation.
For DVB-T reception, turn the antenna in its longitudinal alignment to the transmitter rotated 90° counter-clockwise.
Observe the direction of rotation, as otherwise moisture can ingress in the connection box through the cable entry.
If the antenna was properly mounted, the cable outlet points slantwise down, and the Kathrein-writing is legible
horizontally-aligned (Fig. 6). If not, the Kathrein-writing is upside-down.
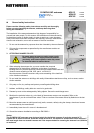
Safety instruction:
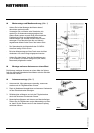
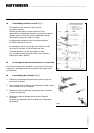
Mounting steps
The following steps must be carried out in order to be able to mount the antenna on the mast so that vertically
polarised signals can be received:
1. Unfasten the mast clamp from the axle tube by loosening the clamping screw
2. Pull off the mast clamp
3. Rotate the clamp 90° clockwise
4. Slide the mast clamp on the previous position on the axle tube
5. Then tighten the clamping screws again
936.2595/B/1104/3.4e
For your own safety, it is recommended that you carry out the mounting steps specified in the
following on solid ground and not on the rooftop.
Fi
g
. 3 Fi
g
. 4