


4. After approximately one hour of charging, the red indicator light should go
““OOFFFF””
and the green light should come
““OONN””
. The green light indicates that the
battery is fully charged.
5. When fully charged, reattach battery pack onto Cordless Waxer/Polisher, making
certain latches fasten securely. Cordless Waxer/Polisher will not operate properly
if the battery pack is not seated properly.
OOPPEERRAATTIINNGG TTHHEE WWAAXXEERR//PPOOLLIISSHHEERR
Be aware that this tool is always in an operating condition
because it does not have to be plugged into an electrical outlet. Always turn the
switch
““OOFFFF””
and remove the battery pack before changing bonnets or
servicing.
BBEEFFOORREE UUSSEE::
• Make sure the car is
clean. Wash thoroughly
to remove all dirt and
road film. Waxing a dirty
car will scratch the car’s
finish.
• Remove the battery
pack to prevent acciden-
tal starting.
• Turn the waxer upside-
down with the foam pad
facing up.
• Slip the synthetic wool bonnet over the foam pad. Tuck the elastic down evenly
around the pad so the bonnet will not come off while in use.
14
OONNEE HHOOUURR CCHHAARRGGEERR ##669900550077
BBeeffoorree uussiinngg bbaatttteerryy cchhaarrggeerr,, pplleeaassee rreeaadd ccaarreeffuullllyy aallll
iinnssttrruuccttiioonnss aanndd ccaauuttiioonnaarryy mmaarrkkiinnggss oonn bbaatttte
erryy cchhaarrggeerr,, bbaatttteerryy ppaacckk aanndd
pprroodduucctt uussiinngg bbaatttteerryy..
UUssee oonnllyy tthhee cchhaarrggeerr wwhhiicchh aaccccoommppaanniieedd yyoouurr pprrood
duucctt oorr ddiirreecctt rreeppllaacceemmeenntt aass
lliisstteedd iinn tthhiiss mmaannuuaall..
Do not substitute any other charger. Use only Alltrade
approved chargers with your product.
DDoo nnoott ddiissaasssseemmbbllee cchhaarrggeerr..
DDoo nnoott uussee cchhaarrggeer
r iiff iitt hhaass bbeeeenn ddaammaaggeedd,, lleefftt oouuttddoooorrss iinn tthhee rraaiinn,, ssnnooww,, wweett
oorr ddaammpp eennvviirroonnmmeennttss,, oorr iimmmmeerrsseedd iinn l
liiqquuiidd..
TThhee bbaatttteerryy ppaacckk aanndd cchhaarrggeerr hheeaatt dduurriinngg cchhaarrggiinngg..
Place the charger on a flat,
non-flammable surface away from flammable materials with at least four inches of
clearance to allow proper air circulation around the charger and battery pack.
WWhheenn tthhee bbaatttteerryy ppaacckk rreeqquuiirreess rreecchhaarrggi
inngg,, aa 11 hhoouurr cchhaarrggee aalllloowwss tthhee ttooooll ttoo
ooppeerraattee aatt ffuullll ppoowweerr..
A charging indicator light on the charger will illuminate to
show that charging is taking place.
CCHHAARRGGIINNGG BBAATTTTEERRYY PPAACCKK UUSSIINNGG OONNEE HHOOUURR CCHHAARRGGEERR ##669900550077
CCHHAARRGGEE BBAATTTTEERRYY PPAACCKK::
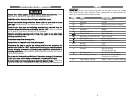
1. Plug the charger into the nearest
120 volt electrical outlet. The
step of the battery has positive
and negative terminal markings
on it. Align the markings with
the identical markings on the top
of the charger base. Insert the
battery pack into base. Pack will
not insert properly if reversed.
2. Make sure the trigger on the
Cordless Waxer/Polisher is in the
““OOFFFF””
position and remove the
battery pack from the Cordless
Waxer/Polisher.
3. If, when first inserting the battery pack, the red
““OONN””
button does not light up,
press the “SET” button on the charger. When the battery is charging, the red
light is
““OONN””
.
13
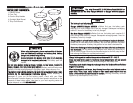
BATTERY PACK
BATTERY
CHARGER