


USING THE PAD SANDER WITH THE DUST COLLECTION SYSTEM:
In order to make full use of the Dust Collection System, the sandpaper must have
holes matching those in the Bottom Foam Pad.
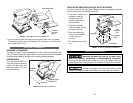
1. If there are no holes in the
sandpaper, install the
sandpaper using the
clamps on both ends of
the Pad Sander.
2. Place the Punchplate
under the sander with the
two tabs in the front.
3. Press the sander down
firmly on the Punchplate
until the holes are
punched.
4. The sander is now ready to
use.
OPERATING THE PAD SANDER
Disconnect the power plug from the AC power source
before any assembly, adjustments, or adding/removing accessories.
Following this preventative step reduces the risk of the sander coming on
accidentally and the risk of damage to the workpiece and injury to the operator.
Remove components from carton and examine contents
carefully. Do not discard carton and packing until components are examined.
10
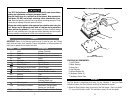
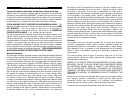
2. Push the Dust Collector all the way into the opening at the rear of the sander.
The collector should fit snug in the adapter. If the collector is not held firmly in
place, replace the "O" ring.
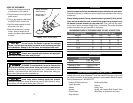
INSTALLING THE SANDPAPER
INSTALLING THE SANDPAPER:
The Pad Sander uses 1/4-sheet size sandpaper. It is held in place by two clamps on each
end of the sander. Depress the clamp release lever on one end and slide the sandpaper
under the clamp. Repeat for the other end to complete installing sandpaper.
ABRASIVE DISKS:
Only use Abrasive Disks hav-
ing a hook and loop fastening
system and with holes that
match the holes on the bot-
tom of this sander.
Sandpaper
Clamp
Sandpaper
Sandpaper Clamp
Release Lever
Punchplate
Sandpaper
Dust
Collection
Bag
Sandpaper
Clamp
FIGURE 4. USING THE SANDPAPER PUNCHPLATE
FIGURE 3. INSTALLING THE SANDPAPER
"O" Ring
Dust Collection Bag
Push all the
way in for a
snug fit
FIGURE 2. ATTACHING THE DUST COLLECTION BAG