


RREEMMOOVVIINNGG//AATTTTAACCHHIINNGG BBAATTTTEERRYY PPAACCKK
RREEMMOOVVEE BBAATTTTEERRYY PPAACCKK::
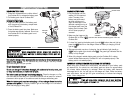
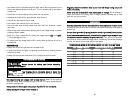
1. Press both release buttons on either side of
the Cordless Drill to release the battery pack.
2. Pull battery pack free of Cordless Drill.
AATTTTAACCHH BBAATTTTEERRYY PPAACCKK::
1. Align the raised portion of the battery pack
with the groove in the battery compartment
of the Cordless Drill.
2. Press the battery pack into place. Make sure
the latches are securely fastened. Do not use
the Cordless Drill if the battery pack is not
seated properly.
CCHHAARRGGEERR
BBeeffoorree uussiinngg bbaatttteerryy cchhaarrggeerr,, pplleeaassee rreeaadd ccaarreeffuullllyy aallll
iinnssttrruuccttiioonnss aanndd ccaauuttiioonnaarryy mmaarrkkiinnggs
s oonn bbaatttteerryy cchhaarrggeerr,, bbaatttteerryy ppaacckk aanndd
pprroodduucctt uussiinngg bbaatttteerryy..
UUssee oonnllyy tthhee cchhaarrggeerr wwhhiicchh aaccccoommppaanniieedd
yyoouurr pprroodduucctt oorr ddiirreecctt rreeppllaacceemmeenntt aass
lliisstteedd iinn tthhiiss mmaannuuaall..
Do not substitute any other charger. Use only Alltrade
approved chargers with your product.
DDoo nnoott ddiissaasssseemmbbllee cchhaarrggeerr..
DDoo nnoott u
ussee cchhaarrggeerr iiff iitt hhaass bbeeeenn ddaammaaggeedd,, lleefftt oouuttddoooorrss iinn tthhee rraaiinn,, ssnnooww,, wweett
oorr ddaammpp eennvviirroonnmmeennttss,, oorr iimmm
meerrsseedd iinn lliiqquuiidd..
TThhee bbaatttteerryy ppaacckk aanndd cchhaarrggeerr hheeaatt dduurriinngg cchhaarrggiinngg..
Place the charger on a flat,
non-flammable surface away from flammable materials with at least four inches of
clearance to allow proper air circulation around the charger and battery pack.
WWhheenn tthhee bbaatttteerryy ppaacckk rreeqquuiirre
ess rreecchhaarrggiinngg,, aa 11 hhoouurr cchhaarrggee aalllloowwss tthhee ttooooll ttoo
ooppeerraattee aatt ffuullll ppoowweerr..
A charging indicator light on the charger will illuminate to
show that charging is taking place.
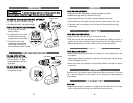
CCHHAARRGGIINNGG BBAATTTTEERRYY PPAACCKK
CCHHAARRGGEE BBAATTTTEERRYY PPAACCKK::
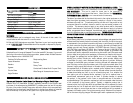
1. Plug the charger into the
nearest 120 volt electrical
outlet. The step of the
battery has positive and
terminal markings on it.
Align the markings on the
identical markings on top of
the charger base. Insert the
battery pack into base. Pack
will not insert properly if
reversed.
2. Make sure the trigger on the
Cordless Drill is in the
““OOFFFF””
position and remove the battery pack from the
Cordless Drill.
3. If, when first inserting the battery pack, the red
““OONN””
button does not light up,
press the
““SSEETT””
button on the charger. When the battery is charging, the red
light is
““OONN””
.
4. After approximately one hour of charging, the red indicator light should go
““OOFFFF””
and the green light should come
““OONN””
The green light indicates that the
battery is fully charged.
5. When fully charged, reattach battery pack onto the Cordless Drill, making
certain latches fasten securely. Cordless Drill will not operate properly if the
battery pack is not seated properly.
IIMMPPOORRT
TAANNTT IINNFFOORRMMAATTIIOONN FFOORR RREECCHHAARRGGIINNGG HHOOTT BBAATTTTEERRIIEESS
When using your Cordless Drill continuously, the batteries in your battery pack
will become hot. You should let a hot battery pack cool down for approximately
30 minutes before attempting to recharge. When the battery pack becomes
discharged and is hot, the red light on the charger will flash. When the battery
pack cools down, the red light will glow continuously to indicate fast charging
mode, 1-hour charge time.
TThhiiss wwiillll ooccccuurr wwhheenn ccoonnttiinnuuoouuss uussee ooff yyoouurr CCoorrddlleessss
D
Drriillll ccaauusseess tthhee bbaatttteerryy ppaacckk ttoo bbeeccoommee hhoott..
It does not occur under normal
circumstances.
1211
RELEASE
BUTTON
BATTERY
CHARGER
BATTERY PACK