


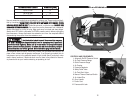
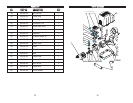
CCOOMMPPRREESSSSOORR FFEEAATTUURREESS::
1.
AAUUTTOOMMAATTIICC OONN//OOFFFF PPRREESSSSUURREE SSWWIITTCCHH
: This compressor is equipped with
an automatic on/off pressure switch. The compressor will only run when the
switch is in the ON/AUTO position. Once the tank has reached the desired pre-
set pressure (“cut-out” pressure), the pump motor will automatically shut off.
While the switch is in the ON/AUTO position, the pump motor will automatically
turn back on once the pressure in the tank drops below the minimum preset
pressure (“cut-in” pressure).
DDoo nnoott lleeaavvee tthhee ccoommpprreessssoorr uunnaatttteennddeedd wwhhiil
lee tthhee ppoowweerr
sswwiittcchh iiss iinn tthhee oonn//aauuttoo ppoossiittiioonn..
2.
AAIIRR TTAANNKK PPRREESSSSUURREE GGAAUUGGEE::
The tank pressure gauge provides a reading of
the air pressure inside of the compressor tank.
3.
OOUUTTLLEETT PPRREESSSSUURREE GGAAUUGGEE::
The outlet pressure gauge provides a reading of
the air pressure at the outlet side of the regulator. This pressure is controlled by
the pressure regulator and is always less than or equal to the air tank pressure.
4.
AAIIRR CCOOUUPPLLEERR::
The air coupler is preinstalled into standard 1/4" NPT (F) threads
in the pressure manifold. Use PTFE thread-sealing tape on the threads to make
sure you have an airtight connection when replacing quick connect coupler.
5.
PPRREESSSSUURREE RREEGGUULLAATTOORR::
The regulator allows you to select the amount of air
pressure that is output through the air hose into tools and accessories. Turn the
pressure regulator knob clockwise to increase discharge pressure, and counter
clockwise to decrease discharge pressure. Please refer to the air delivery
requirements of your tools for the proper pressure settings.
NNOOTTIICCEE::
Be careful not to overtighten pressure regulator knob when it “bottoms
out” as this may damage pressure regulator.
6.
SSAAFFEETTYY RREELLIIEEFF VVAALLVVEE::
This compressor is equipped with a safety relief valve that
is designed to prevent system failures by relieving pressure from the system when
the air pressure reaches a predetermined level. The safety relief valve is preset by the
manufacturer.
DDOO NNOOTT
attempt to modify or remove the safety relief valve.
7.
AAIIRR TTAANNKK DDRRAAIINN VVA
ALLVVEE::
Moisture is produced whenever air is compressed. It
is critical to drain water from the air tank on this compressor frequently. If unit
is used only occasionally, tank should be drained after each use and prior to the
next use. To drain the tank, slowly open the tank drain fitting by turning counter
clockwise. Once all moisture has drained out, close the fitting securely.
NNOOTTEE::
Air tank will not pressurize while drain valve is open.
A dirty air filter will reduce air compressor performance
and can lead to product failure.
8.
MMAANNUUAALL TTHHEERRMMAALL OOVVEERRLLOOAADD SSWWIITTCCHH::
The electric motor has a manual
thermal overload protector. If the motor overheats for any reason, the thermal
overload protector will shut off the motor. Turn pressure switch to the “off”
position and wait for unit to cool before pushing the reset button and restarting
the compressor. NOTICE: This air compressor is designed for household use
only and is not intended to operate heavy-duty air tools. If your application’s
demands exceed the capacity of this air compressor, a larger air compressor
that is matched to your application is recommended. If the unit shuts down
again, please call the consumer helpline at 1-800-590-3723 for assistance.
9.
AAIIRR IINNTTAAKKEE FFIILLTTEERR::
This compressor is equipped with an externally accessible
air intake filter that is designed to clean air coming into the pump. The filter
element is easily removed for periodic cleaning. Use compressed air to blow
loose dirt and debris from the paper filter element and reinstall. Replace filter
element when necessary.
10.
CCAARRRRYY HHAANNDDLLEE::
Convenient handle for easy transport.
OOPPEERRAATTIINNGG TTHHEE AAIIRR CCOOMMPPRREESSSSOORR
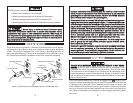
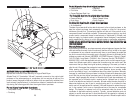
IINNIITTIIAALL SSEETTUUPP // BBRREEAAKK--IINN PPRROOCCEEDDUURREE::
DDoo nnoott aattttaacchh aaiirr hhoossee,, aaiirr ttoooollss oorr ootthheerr aaiirr aacccceessssoorriieess
ttoo tthhe
e aaiirr oouuttlleett uunnttiill bbrreeaakk--iinn pprroocceedduurree hhaass bbeeeenn ssuucccceessssffuullllyy ccoommpplleetteedd..
1. Read and understand the entire instruction manual, including all safety warn-
ings before setting up air compressor.
2. Place air compressor on a flat, level surface.
3. Turn the pressure regulator knob fully clockwise to open airflow from air outlet port.
Be careful not to overtighten pressure regulator knob when
it “bottoms out” as this may damage pressure regulator.
4. Turn the power switch to the OFF position.
5. Plug power cord directly into a properly grounded power source of the correct
voltage (see Grounding Instructions on page 5 of this instruction manual).
6. Open the tank drain valve to allow air to escape preventing air pressure buildup
in the air tank.
7. Turn the compressor ON by moving the switch to the AUTO/ON position and
run the air compressor for a period of 20 minutes to break-in the air pump.
1413