


OOPPEERRAATTIINNGG TTHHEE DDRRIILLLL
NNeevveerr ttaappee tthhee ttrriiggggeerr sswwiittcchh ddoowwnn ttoo pprroovviiddee ccoonnttiinnuu--
oouuss hhiigghh ssppeeeedd..
The tool may fail under such conditions causing fire or
personal injury.
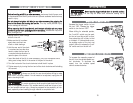
OOPPEERRAATTIINNGG TTHHEE OONN//OOFFFF SSWWIITTCCHH
Squeeze the trigger switch to turn
the tool “ON”. Release the trigger
switch to turn the tool “OFF”.
When drilling for extended periods,
the “Lock-On” switch may be used,
but do not use this switch in situa-
tions where the drill is likely to bind
or kickback. If kickback does occur,
the sudden motion of the tool may
make it difficult to release the “Lock-
On” switch and turn the drill off.
SSPPEEEEDD CCOONNTTRROOLL AADDJJUUSSTTIINNGG SSWWIITTCCHH
To increase the operating speed of
the drill, turn the variable speed con-
trol clockwise. To decrease the
speed, turn the variable speed
control counterclockwise.
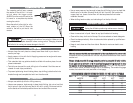
IINNSSTTAALLLLIINNGG DDRRIILLLL BBIITT IINNTTOO KKEEYYLLEESSSS CCHHUUCCKK
BBeeffoorree iinnsseerrttiinngg aa ddrriillll bbiitt oorr ootthheerr aacccceessssoorryy,,
make sure the drill power cord
is disconnected from the AC power source to prevent accidental starts that may
result in injury.
DDoo nnoott aatttteemmpptt ttoo ttiigghhtteenn ddrriillll bbiittss ((oorr aannyy ootthheer
r aacccceessssoorryy)) bbyy ggrriippppiinngg tthhee
ffrroonntt ooff tthhee cchhuucckk aanndd ttuurrnniinngg tthhee ttooooll oonn..
This may cause personal injury
and/or damage to the chuck.
WWhheenn rreemmoovviinngg tthhee bbiitt ffrroom
m tthhee ttooooll,, aavvooiidd ccoonnttaacctt wwiitthh sskkiinn aanndd uussee pprrooppeerr
pprrootteeccttiivvee gglloovveess wwhheenn ggrraassppiinngg tthhee bbiitt oorr aacccceesssso
orryy..
Accessories may be hot
after prolonged use.
1. Unplug the drill. Never change
bits on a live drill.
2. Make sure the bit is undam-
aged, sharp and free from
wood or metal shavings.
3. Hold the rear end of the chuck
in one hand and use the other
hand to rotate the front end in
a counterclockwise direction to
open the jaws of the chuck.
4. Insert the shank of the bit (or other accessory) fully into the keyless chuck,
taking care to keep the bit in the center of the jaws of the chuck.
5. Turn the front end of the chuck clockwise to hold the bit in place.
6. Tighten securely by turning the front end of the chuck clockwise while holding
the rear end.
Always run the drill for one minute before drilling to make
sure the bit is properly seated. If the bit needs to be adjusted, unplug the drill
before touching the bit.
In certain situations, the bit may bind and the drill will kick-
back in the opposite direction. This sudden reaction could lead to loss of con-
trol and possible serious injury. Always be prepared for the possibility of kick-
back, especially when breaking through material to complete a hole.
WARNING
109
TIGHTEN
LOOSEN
HOLD HERE