


5
www.kompernass.com +++ www.kompernass.com +++ www.kompernass.com +++
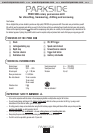
AREA OF USE
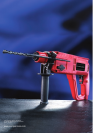
The PEBH 900 rotary percussion drill can be used successfully for light chiselling work. The drill can also be used for rotary percussion drilling
in brick, concrete, and natural stone as well as for breaking off plaster or rendering. The area of use of the drill also includes drilling holes in
wood, plastic and metal, and its use as a screwdriver.
OPERATION
Take note of the mains voltage. The voltage must agree with that shown on the identification plate (equipment shown as 230 V can also be
used with 220 V).
SWITCHING ON AND OFF
Whilst operating the drill you can select between instantaneous and continuous operation. For short periods of operation choose the
instantaneous mode and for longer periods of operation choose the continuous mode. This is how to operate the drill at your chosen setting:
INSTANTANEOUS OPERATION ON: Press ON/OFF
ቧ trigger
INSTANTANEOUS OPERATION OFF: Release ON/OFF
ቧ trigger
CONTINUOUS OPERATION ON: Press ON/OFF
ቧ trigger and lock in position with the trigger lock button ቪ
CONTINUOUS OPERATION ON: Press ON/OFF ቧ trigger once more and release.
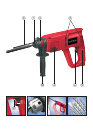
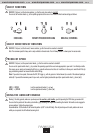
INSERTING / REMOVING TOOLS
INSERTING TOOL
Before inserting the tool, lightly greasethe chuck and clean if necessary. To insert pull the locking/unlocking cap ባbackwards and
insert the tool. You should be able to hear clearly the tool engaging if it has been inserted correctly. Releasing the locking/unlocking cap
ባ
locks the mechanism. Check by pulling the tool that it is correctly locked. The device is designed so that tool has a certain amount of radial
and axial play. The centring takes place automatically once the motor is started.
REMOVING TOOL
To remove the tool, pull the locking/unlocking cap ባ backwards again and remove the tool.
ADDITIONAL CHUCK FOR STRAIGHT SHANK DRILL BITS
INSTALLING ADDITIONAL CHUCK FOR STRAIGHT SHANK DRILL BITS
To install the additional chuck for straight shank drill bits (see Fig.
ቭ , pull the locking/unlocking cap ባ backwards and insert the
additional chuck. You should be able to hear clearly the additional chuck engaging if it has been inserted correctly. Releasing the
locking/unlocking cap
ባ locks the mechanism. Check by pulling the tool that it has correctly locked.
REMOVING ADDITIONAL CHUCK FOR STRAIGHT SHANK DRILL BITS
To remove the additional chuck, pull the locking/unlocking cap
ባ backwards again and remove the additional chuck.