


13 GB/IE/CY
Operation / Maintenance and cleaning / Disposal / Information
j Place the belt sander on to the mounting frame
12
and guide the dust extraction spout
5
through the opening of the mounting frame
12
.
Tighten the screws
16
.
j Place the two clamp plates
13
on to the holes
provided on the opposite side and screw the
clamp plates tight with the provided screws.
j Insert the pins of the screw clamps
14
into the
holes on one of the long sides of the mounting
frame
12
(see Fig. E). Attach the mounting
frame
12
by tightening the screw clamps
14
.
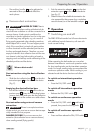
Sanding vertically (see Fig. F):
j Insert the pins of the screw clamps
14
into the
holes on one of the short sides of the mounting
frame
12
. Attach the mounting frame
12
to a
flat, stable surface (e.g. workbench) by tighten-
ing the screw clamps
14
.
j Insert the two spacer plates
15
into the holes
provided for them on the supporting surface of
the mounting frame
12
. The tapers must narrow
towards the outside (see Fig.).
j Place the belt sander on to the mounting frame
12
and guide the dust extraction spout
5
through
the opening of the mounting frame
12
. Tighten
the screws
16
.
j Place the two clamp plates
13
on to the holes
provided on the opposite side and screw the
clamp plates tight with the provided screws.
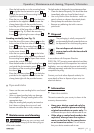
Q
Tips and tricks
j Never use the same sanding belt to sand wood
and metal.
j Worn or ripped sanding belts can damage
the workpiece. Change sanding belts at the
appropriate time.
j Keep the sanding belt properly tensioned so
that it does not hang down too much and
become unusable due to nicks, creases etc.
Q
Maintenance and cleaning
WARNING!
Before you carry out any work
on the belt sander always pull the mains plug out
of the mains socket.
The belt sander is designed to be maintenance-free.
j Clean the device frequently. This should be done
immediately after you have finished using it.
j Use a dry cloth to clean the device - never use
petrol, solvents or cleaners that attack plastic.
j Always keep the ventilation slots clear.
j Remove any adhering dust with a narrow
paint brush.
Q
Disposal
The packaging is wholly composed of
environmentally-friendly materials that can
be disposed of at a local recycling centre.
Do not dispose of electrical
power tools with the household
rubbish!
In accordance with European Directive
2002 / 96 / EC (covering waste electrical and elec-
tronic equipment) and its transposition into national
legislation, worn out electrical power tools must be
collected separately and taken for environmentally
compatible recycling.
Contact your local refuse disposal authority for
more details of how to dispose of your worn out
electrical devices.
Q
Information
Q
Service centre
The service centre for your country is shown in the
warranty documentation.
J Have your device repaired only by
qualified specialist personnel using
original manufacturer parts only. This
will ensure that your device remains safe to use.
J If the plug or mains lead needs to be
replaced, always have the replace-
ment carried out by the manufactur-
er or its service centre. This will ensure
that your device remains safe to use.