


OPERATING INSTRUCTIONS
• Prior to use, draw the soldering tip through the soldering paste which is also supplied.
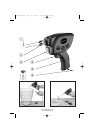
• Direct the soldering tip ቢ towards the soldering point.
• Actuate the push-button switch ብ. The operation indicator ቤ lights up
• In order to heat up the soldering tip, keep the switch pressed down for max 12 sec. before
starting the soldering work until the necessary soldering heat has been reached - then let go
of the push-button switch.
Never
operate the soldering gun for continuous peroids!
The duration of the power supply controls the soldering heat (longer power supply = higher
soldering heat). During the soldering process, never keep the push-button switch pressed down
for too long. Determine the necessary duration of the power supply in practice by checking the
soldering heat.
Pr
ess the ON/OFF switch
ብ for
a maximum of 12 seconds – then do not operate
the gun
for at least 48
seconds.
As soon as you let go of the push-button switch, the soldering heat is reduced automatically.
If the switch is actuated again, the heat increases rapidly. Constant soldering heat guarantees
an optimum soldering quality, melting of the soldering tip due to excessive temperatures is avoided
and the service life of the device is extended.
Prior to use, draw the soldering tip through the soldering paste which is also supplied.
Because the operating temperature is reached quickly, the device functions in a very energy-saving
manner. The special shape of the soldering-gun tip makes partial heating possible. Thus, the device
is particularly operator-friendly and accelerates the heating process in the case of tin soldering.
MAINTENANCE OF THE DEVICE
Soldering tips and the soldering gun housing are connected together using screws and nuts so
that the soldering tips can be quickly and easily changed.
Because the tip melts and wears after lengthy use, it is necessary to replace it at regular intervals.
CHANGING THE SOLDERING TIP
Unscrew and remove the two fixing screws connecting the tip and the housing. Replace the
old tip with a new one and re-insert and tighten the screws. The device is then ready for operation
once again.
5
ƽ
www.kompernass.com +++ www.kompernass.com +++ www.kompernass.com +++
4_PLP180#4_GB_+IRL 10.03.2003 14:40 Uhr Seite 5