


10 GB/IE/CY
Commissioning / Operation / Cleaning and Maintenance
Q
Commissioning
The mains voltage at the mains socket must match
that shown on the rating plate on the device. Devices
marked with 230 V
~
can also be operated at
220 V
~
.
Q
Operation
Q
Placing the bonnet on the
buffing plate
1. Turn the waxer/polisher over so that the polish-
ing disc
2
is pointing upwards.
2.
Place the bonnet
5
6
over the buffing
plate
2
. Ensure that the bonnet
5
6
is
placed centrally and taughtly onto the buffing
plate.
Q
Applying wax / polish
with the terry bonnet
1. Always use high quality products for waxing.
j Follow the working methods given on the
packaging.
2. Apply the wax / polish directly on the working
surface of the terry bonnet
5
.
j Spread the wax / polish so that it forms a thin,
even, complete coating over the terry bonnet
5
.
Note: Too much wax does not necessarily
achieve a better finish and you will have to
spent more time later removing the coating.
3. Spread the wax evenly right up to the edge of
the terry bonnet
5
.
Q
Switching on the device
and waxing / polishing the
paintwork
Note: The paintwork to be polished must be care-
fully cleaned and completely dry. If necessary, use
a paintwork cleaner. Use products that are appro-
priate for the demands on and condition of your
paintwork. Heavily oxidised paintwork will require
the use of a special cleaner. For this use a combined
product (cleaner + wax).
1. Place the waxer/polisher on the surface to be
polished.
Note: To avoid the splattering of wax or polish,
do not switch the appliance on yet. Dab the
appliance a few times at various points on the
area to be buffed. In this way you can ensure
that excess wax / polish is once more distributed
evenly over the terrycloth bonnet and the area
to be buffed.
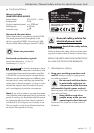
2. Take both appliance grips
1
firmly in your
hands and switch the appliance on by pressing
the ON / OFF switch
3
(see also Fig. B).
3. Guide the waxer/polisher evenly over the
paintwork (see Fig. C).
Note: Do not press on the waxer/polisher!
The self-weight of the waxer / polisher alone
applies sufficient pressure for the waxing / pol-
ishing process.
4. Switch the appliance off before you remove it
from the area being buffed. To do this, release
the ON / OFF switch
3
.
j Any difficult to reach corners or recesses may
have to be completed later by hand. Take the
terry bonnet
5
off the waxer/polisher and
use the bonnet for the corners and recesses.
Q
Polishing or removing wax with
the synthetic polishing bonnet
Note: The wax / polish must be allowed to dry on
sufficiently to produce the best polishing performance.
Otherwise any polish that is still fluid will be smeared
by the polishing bonnet.
j Use the synthetic polishing bonnet
6
for final
polishing or removing the wax.
j When working, always follow the instructions
for use of the wax / polish.
Q
Cleaning and Maintenance
WARNING!
DANGER OF INJURY!
Switch the device off and pull the plug out of the