


PREPARE FORSETUP
1. Begin set up near your existing network router and a
computer with high-speed Internet access.
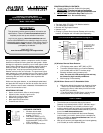
2. Unpack package contents and insert the H2O sensor cord
into the TX71U-IT water detector (see diagram 1).
SETUP AND ACTIVATION
1. Locate the Activation Key Card in the package for setup
instructions and the Activation Key. The Activation Key is
necessary to activate your sensor with Internet Gateway
(sold separately). Keep your Activation Card for reference.
2. Visit www.lacrossealerts.com with your Activation Key
Card to create your account and activate the product.
ACTIVATION INFORMATION:
THE INCLUDED ACTIVATION KEY is good for
3 Months of ENHANCED SERVICE with early warning
text & e-mail alerts, plus 4 more years of BASIC
SERVICE for standard remote monitoring.
Lost your Activation Key Card?
Contact Customer Support:
www.lacrossetechnology.com/support/alerts
Phone: (608) 785-7920
MEASUREMENT LOG DOWNLOAD
Once the sensor is activated and building a measurement log,
you can download the data as a comma separated values
(CSV) file. You must use an application such as Microsoft
Excel® or Google Docs® that supports comma separated
values (CSV) formatted files to view the table data.
SELECT A LOCATION TO MOUNT WATER DETECTOR
• Select a location protected from water and other
precipitation. The case is water resistant, not water proof.
• Place the sensor in a dry, shaded area. Avoid locations with
direct sun, to prevent inaccurate readings.
• Fog and mist will not harm the sensor but direct precipitation
must be avoided.
• Note: Exposing the sensor case to extreme humidity may
temporarily disrupt data. The water detector with LCD should
not be submerged in water.
• Attach the H20 cable sensor to the Remote Water Detector
case and place it on the floor for water monitoring. Secure
the Remote Water Detector case in an area that is protected
from water. Once activated, the H2O/Dry readings will
display on the LCD.
• The H20 sensor on 6 ft. cable is not for use in a pool or hot
tub where chemicals may cause malfunction.
• Select a location within range of the Internet Gateway
(see “IMPORTANT SETUP & OPERATION NOTES”).
CONFIRM CONNECTION BEFORE MOUNTING
• IMPORTANT: Before permanently mounting…Test sensor
in the desired mounting location for at least 1 hour to
confirm good reception. Confirm consistent readings on your
account at www.lacrossealerts.com before permanently
mounting. Move the sensor closer to the Internet
Gateway if the signal is lost or not received.
• Mount the sensor after the activation process
(see “SETUP AND ACTIVATION”).
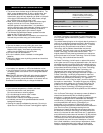
MOUNT TO WALL WITH SCREWS
1. Remove the mounting bracket
2. Place bracket over the desired
location.
3. Mark mounting surface with a pencil
through the 2 holes of the bracket.
4. Screw bracket onto surface and
tighten screws to bracket.
5. Insert the sensor back into the bracket.
FREE STANDING
Attach the mounting bracket to the bottom or
top of the sensor and place it on any flat surface.
PLACEMENT OF THE H2O SENSOR
The H2O sensor should be placed on the dry floor or against
the wall near your foundation, water heater, sump, plumbing,
washer aquarium, or dish washer etc. to monitor for leaks.
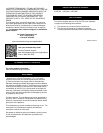
FLOOR:
Place the H2O sensor (circuit board down) on
the dry floor within range of the remote water
detector case that is mounted on the wall or
standing on a table. Note: The water detector
will sit 1/8 inch from the floor in this position.
WALL:
Place the H2O sensor against the wall with the
edge touching the floor within range of the
remote water detector case that is mounted on
the wall or standing on a table.
• The H2O sensor can be secured to the floor or wall with the
included screws & anchors or with two-sided tape (not
included).
• Secure the 6 ft. H2O sensor cable to avoid tripping hazards:
Loosely coil and secure the extra cable with a twist tie.
CLEANING THE H2O SENSOR
Routine cleaning of the H2O sensor
is recommended to ensure proper
operation.
Use clean water and a soft cloth to clean dirt and debris from
the circuit board of the H2O sensor. Note: When using two-
sided tape, replace the tape after cleaning the H2O sensor to
maintain adhesiveness.