


2
High Rate Spring Kit Assembly Instructions Manual No. 701-194M 3/31/08
Land Pride
Further Assistance
■
3. Remove M10 jam nuts (#6), flat washer (#7) and
upper rubber grommet (#8). Keep for reuse.
4. Remove shock & spring assembly from Treker main
frame (#3).
5. Remove mounting washer (#10) and lower rubber
grommet (#8). Keep for reuse.
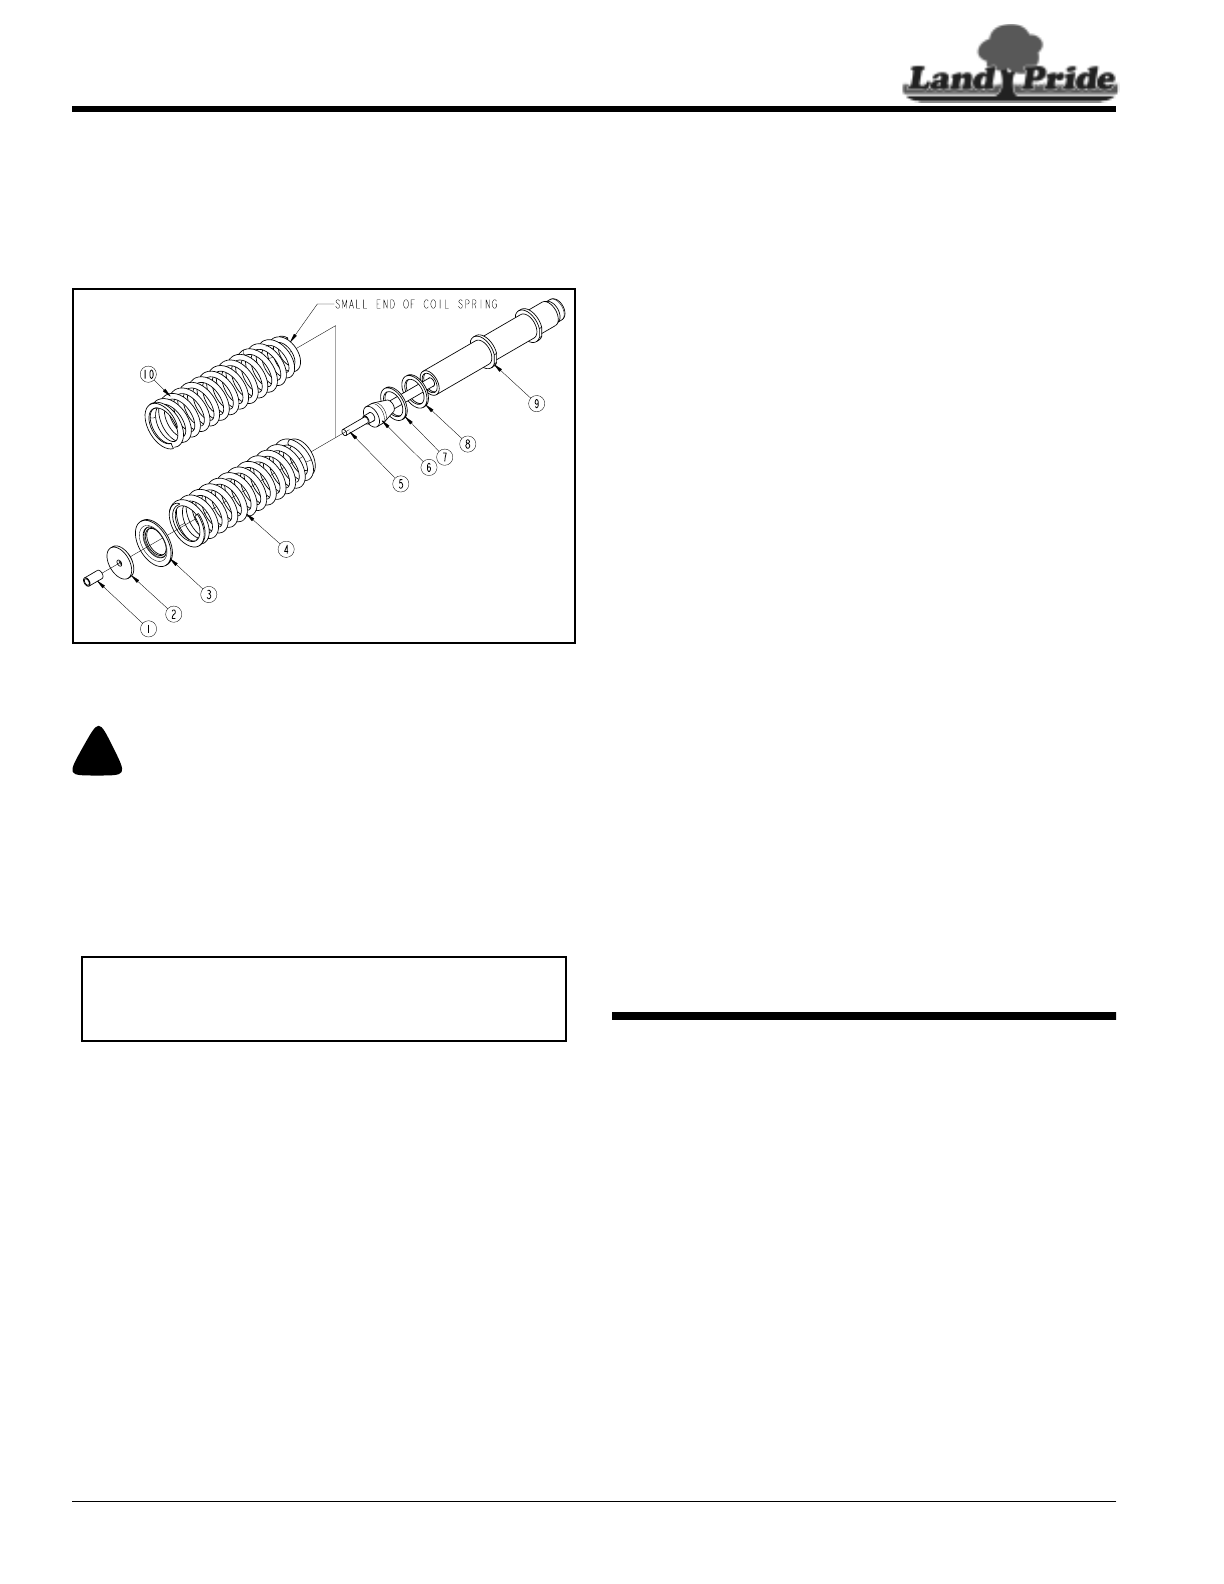
Figure 2
Coil Spring Replacement
!
WARNING
Coil Springs on a shock are compressed and contain high
energy. The coil spring must be removed from the shock
correctly by a person who has knowledge and experience in
how to do this safely. The spring, if not handled properly can
suddenly release its energy causing bodily harm to the worker
and anyone nearby.
Refer to Figure 2:
1. Compress coil spring (#4) 1/2" to 3/4" with a
mechanical device that will safely hold the spring in
its compressed state.
2. Unscrew threaded spacer (#1). Make note that the
threads on the spacer are not full length and that the
end without threads goes on the rod first.
3. Remove spring cap (#2) and spring keeper (#3).
4. Slowly release compression from coil spring (#4),
and remove coil spring.
5. Make sure bump stop (#6), plastic washer (#7) and
steel washer (#8) stay on the shock (#9).
6. Insert smallend of high rate coilspring (#10)onto the
shock against plastic washer (#7).
7. Compress spring overall length to be between 7 1/4"
and 7 1/2" length with a mechanical device that will
safely hold the spring at this length. When
compressed, the spring will contain 315 to345 lbs. of
compressed force.
IMPORTANT: Coil spring must be compressed by a
person who has proper knowledge on how to safely
remove the spring from the shock.
8. Install spring keeper (#3) and spring cap (#2) over
end of spring.
9. Insert nonthreaded end of threadedspacer (#1) over
rod end (#5) and then screw it on completely until the
spring cap (#2) has bottomed out against the rod
stepped surface.
10. Release coilspring andcheck spring length. If spring
length is not 7 7/8", then the threaded spacer (#1),
spring cap (#2) and spring keeper (#3) were not
properly installed and should be reinstalled.
Shock & Spring Assembly Installation
Refer to Figure 1 on page 1:
1. Install lower end of shock & spring assembly (#11)
into steering bracket (#2) and brake assembly (#1).
2. Make sure the shock is fully in with the raised boss
against steering bracket face. Tighten 3/8"-16 hex
head cap screw & nut (#4 & #5) to 31 ft-lbs.
3. Insert lower rubber grommet (#8) and mounting
washer (#10) onto the shock & spring assembly rod.
4. Insert rod through hole in Treker main frame (#3).
5. Insert upper rubber grommet (#8) and flat
washer (#7) onto the shock & spring assembly rod.
6. Screw M10 hex jam nut (#6) ontothe rod end until flat
washer (#7) is tight against the threaded spacer. It
may be necessary to hold top of shock & spring
assembly rod to tighten the jam nut.
7. Screw the second M10 hex jam nut (#6) on until it is
tight against the first jam nut.
8. Hold the first nut in place and torque the second nut
to 24 ft-lbs.
9. Reinstall wheel and lower Treker to ground level.
10. Repeat assembly instructions for the left side and
then remove wheel chocks before driving the vehicle.
Further Assistance
Your dealer wants you to be satisfied with your new High
Rate Coil Springs. If for any reason you do not
understand any part of this manual or are not satisfied
with the service received, the following actions are
suggested:
1. Discuss the matter with your dealership service
manager. Make sure he is aware of your problems
and has had the opportunity to assist you.
2. If you are still not satisfied, seek out the owner or
general manager of the dealership, explain the
problem and request assistance.
3. For further assistance write to:
Land Pride Service Department
1525 East North Street
P.O. Box 5060
Salina, Ks. 67402-5060
E-mail address
lpservicedept@landpride.com