


EN
F
E
P
5
Leica DISTO™ D5 LCA782204a en
Start-up
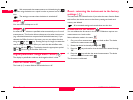
Changing the reference point (multifunctional
endpiece)
See figure {B}
The instrument can be adapted for the following measuring situations:
• For measurements from an edge, fold out the positioning bracket until
it first locks in place. See figure {C}.
• For measurements from a corner, open the positioning bracket until
it locks in place, then push the positioning bracket lightly to the right
to fold it out fully. See figure {D}.
A built-in sensor automatically detects the orientation of the positioning
bracket and adjusts the zero point of the instrument accordingly.
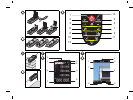
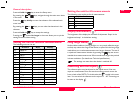
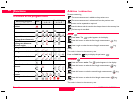
Keypad
See figure {E}:
1 ON / DIST (On/measuring) button
2 Digital pointfinder - button
3 Timer button
4 Plus (+) button
5 Minus (-) button
6 Area / volume button
7 Indirect measurement (Pythagoras) button
8 Trapezoid button
9 Functions button
10 Reference button
11 Storage/Memory button
12 Clear/Off button
13 Menu/Equal button
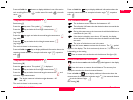
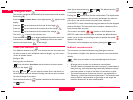
Display in normal mode
See drawing {F.1}.
The graphics screen of the measurement window is split into different
areas. Top left is the brightest field, which contains the currently selected
measuring program. Just to the right appears the program submenu, which
shows the measuring programs that can be selected by pressing the same
key the required number of times.
The measurement field contains the individual measurements of the
measuring program with reference to a series of separate distance measu-
rements. Three lines are provided for this. A horizontal line separates the
measurement field and the result bar from one another. A red triangle
indicates whether the selected measuring program has a detailed display
available.
1 Program selection with measurement instructions
2 Program selection submenu
3 Level
4Timer
5 Measurement field
6 Result bar
7 Detailed display
8 Status bar with (Laser ON, Reference plane, Display Long range mode,
Offset, Plus / Minus, Battery status)