


10
Operation
Leica Lino 757665i en
de
en
F
I
E
P
NL
DK
S
N
FIN
J
CN
ROK
PL
HR
H
RUS
CZ
GR
LT
LV
EST
SLO
SK
m
TR
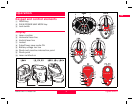
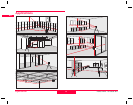
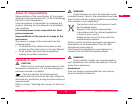
Checking the accuracy of the vertical plumb
points:
(only Lino P3, Lino P5 and Lino L2P5)
Place the Lock switch 3 in the "Unlocked" ( )
position.
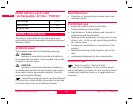
Checking the upper plumb point:
Checking the lower plumb point:
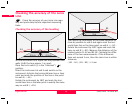
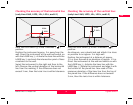
Set up the laser on its tripod or wall mount bracket
near point A1 at a minimum distance of 1.5 m from
point B1. The horizontal laser is aligned in direction 1.
Mark the laser points A1 and B1 with a pin.
Rotate the instrument by 180° so that it points in the
opposite direction 2 to direction 1. Adjust the instru-
ment so that the laser beam hits point A1 exactly. If
point B2 is no further than 2 mm away from point B1,
then the Leica Lino is within tolerance.
Should your Leica Lino be outside of the spec-
ified tolerance, please contact an authorised dealer-
ship or Leica Geosystems.
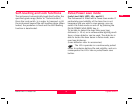
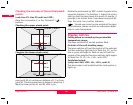
Display notices
Falling below or exceeding the permissible
temperature range:
The laser switches off and all symbols flash.
Outside of the self-levelling range:
The laser switches off and the symbol of the selected
function indicator light starts to flash (for L2), or the
line or point will begin to flash on and off and the
symbol of the selected function indicator light begins
to flash (for P3, P5, L2+, L2G+, and L2P5).
Pendulum locked:
(only Lino L360, L2P5, L2+, L2G+, and L2)
The laser beam is not levelled and the Lock symbol 7
lights up.
1
B1
A1
B2
1.5 m
max. 2 mm
2
1
B1
A1
B2
1.5 m
max. 2 mm
2