


8
Instruction Manual V1.1 - 12/2003
Leica SP1600 – Saw Microtome
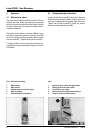
3.5 Setting the section thickness
Unclamp the lever (5.5). First set the scale ring (5.3) to
O (a height adjustment is not yet made). To set the sec-
tion thickness, turn the knurled knob (5.4)
anticlockwise. Every division on the scale represents
10 µm. Clamp at the chosen thickness with the lever
(5.5).
When setting section thickness, the thick-
ness of the saw blade (approx. 300 µm) must
always be taken into account. For example,
a setting of 400 µm is necessary to obtain a
100 µm thick section.
Switch on the motor. Then release the object arm clamp
(2.2). Set the feed to the maximum rate until the object
has almost reached the saw blade. Use a slower speed
for cutting (see under 3.3).
The water cooling device is imperative for the sawing
process.
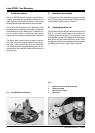
3.6 Removing the section
If the section is relatively thin, it will stick to the blade
after sawing because of the adhesive power of the
water.
Thicker sections are generally pushed to the outer edge
of the saw blade due to the centrifugal force.
Switch off the motor and remove the section. The next
section can now be made as described under 3.5. It
can happen, although it is very unusual, that the sec-
tion falls into the inside of the microtome. It should not
be fetched out before the sectioning work has been
completed, as the object holder and saw have to be
removed.
3.7 Changing the object
Push the object arm (2.4) back until it clicks into place.
Switch off the motor and turn off the water supply. Take
hold of the object holder by the knob (4.4) and pull out
after loosening the knurled screw (5.1). Continue as de-
scribed under 3.1.
4. General information
Due to the thin blade of the inner-hole saw, incorrect
handling can very soon lead to damage of the edge (e.
g. deformation), making it impossible to produce thin
sections.
Even an extremely high feed rate, especially at the mo-
ment when the object makes contact with the rotating
saw, can result in premature wear or damage to the
saw.
As a general rule, the slower the feed rate, the longer
the life of the saw blade, which also depends on the
type of object. It is not possible to repair the saw when
defect; it must be replaced. The following are symp-
toms suggesting that the saw blade is no longer work-
ing properly and must be replaced:
The object takes considerably longer to pass through
the blade (using the same object and same feed rate).
The blade “jumps” out of the object (object only par-
tially cut).
The edge of the saw is smooth (no diamond coating
left).
The saw rotation is no longer exactly circular.
If these factors are noticed the saw blade must be re-
placed as follows:
Pull out the object holder. Remove the plastic cover
(3.2). The saw blade in the annular frame is uncovered.
Loosen the screws in the two drilled holes with the
Allen key (4 mm). The screws remain in the annular
frame. Clean the underlying parts of the cylinder. In-
sert a new saw and press down to ensure a uniform
bearing surface.
Tighten the Allen screws. Insert the object holder (see
under 3.1).
The faulty saw together with the annular frame must
be sent to the following address:
Leica Microsystems Nussloch GmbH
Heidelberger Str. 17-19
69226 Nussloch
Germany