E-2
TROUBLESHOOTING
E-2
TANDEM MIG TORCH
Observe all Safety Guidelines detailed throughout this manual
If for any reason you do not understand the test procedures or are unable to perform the tests/repairs safely, contact your
Local Lincoln Authorized Field Service Facility for technical troubleshooting assistance before you proceed.
CAUTION
PROBLEMS
(SYMPTOMS)
POSSIBLE
CAUSE
RECOMMENDED
COURSE OF ACTION
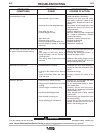
The drive rolls turn, but wire will not feed
or wire feeding is rough.
The arc starts, but during the weld the
arc goes out and wire keeps feeding.
Water leaks from the torch.
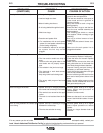
Porosity in the weld.
a. Gun cable is kinked and/or twisted.
b. Wire jammed in gun or cable.
c. Incorrect drive rolls and guide tubes.
d. Gun cable liner dirty.
e. Conduit clogged or dirty.
f. Worn drive rolls.
g. Electrode rusty or dirty.
h. Worn or improperly sized cable liner.
i. Partially flashed, melted or improper
contact tip.
a. Loose electrode or work lead connec-
tion.
b. The output of the Power Wave is
being exceeded, and the machine is
"phasing back".
c. The wrong weld program has been
selected.
a. Misassembled torch shield.
b. O-rings on the nozzle are cut, worn or
torn.
c. Loose connections where the cables
enter the torch.
a. The parts to be welded are dirty.
b. The parts to be welded have a surface
coating.
c. The arc length is excessively long.
d. Insufficient shielding gas flow.
e. Gas solenoid not turning on.
f. Loose shielding gas connections.
a. Keep as straight as possible. Inspect
cable and replace if necessary.
b. Remove wire from gun and cable,
then feed in new wire. Check for any
obstructions. Replace the liner if nec-
essary.
c. Be sure the wire diameter being used
matches the sizes of the drive rolls
and guide tubes.
d. Clean or replace liner.
e. Blow the conduit out with compressed
air. Check for obstructions. Replace
conduit if necessary.
f. Replace or reverse split drive rolls.
g. Replace the electrode.
h. Replace cable liner.
i. Replace the contact tip.
a. Verify that all the connections are tight
and are not overheating.
b. Change the welding procedure to
reduce the output current.
c. Make sure the welding program on the
power source matches the wire size
and gas actually being run.
a. Assemble the torch shield properly. It
should be flush with the bottom of the
barrel.
b. Replace the o-rings.
c. Properly connect the cables to the
torch.
a. Remove dirt, oil, lubricants and scale
from the part to be welded.
b. Do not weld painted, plated or insula-
tion-coated parts.
c. Properly set the weld procedure.
Generally arc lengths do not exceed
approximately 1/4".
d. Verify that the torch is being supplied
with 65 scfh.
e. Check that the gas solenoid fully turns
on during welding.
f. Check that all the connections are
sealed and that there are no cuts or
kinks in the shielding gas line.


