


D-3
MAINTENANCE
D-3
1. Close the fuel shutoff valve located under the fuel
tank.
2. Unscrew the cap ring located on the top of the filter
header and remove the plastic center cap and O-
ring.
3. Remove the large white volume plug located
directly under the center cap in the upper cavity of
the filter header. Use a small screwdriver (or simi-
lar device) to lift the plug part way out of the cavity
to assist with its removal.
Be careful not to damage the pre-filter screen
with the tool used to remove the plug.
4. Using a pair of pliers, gently tug on the pull tabs of
the pre-filter screen in an alternating pattern to
gradually remove the pre-filter screen.
5. Brush off any debris and rinse in diesel fuel.
6. Re-install the pre-filter screen into the upper cavity
of the filter header making sure the four pull tabs
are pointing up. Putting your fingers on the pull
tabs, push down evenly until the lower body of the
pre-filter screen contacts the floor of the upper cav-
ity.
7. Re-insert the large white volume plug into the
upper cavity.
8. Place the O-ring onto the angled seal surface of
the filter header and re-install the plastic cap. Make
sure its flange rests on the O-ring.
9. Screw on the cap ring and tighten hand tight.
10. Remember to open the fuel shutoff valve before
starting the engine.
WATER SEPARATOR ELEMENT
The water separator element is a two stage filter with
a special filtration/water separating media, and an
expanded water reservoir providing maximum protec-
tion against water in the fuel. The recommended
change interval for the water separator element is
1,000 hours. The procedure for changing the element
is as follows:
1. Close the fuel shutoff valve located under the fuel
tank.
2. Rotate the quick change ring (located just below fil-
ter header) clockwise approximately 1/2 turn and
slide it down and off of the element.
3. Grasp the element and pull down with a slight rock-
ing motion to remove the element from the grom-
met post on the bottom of the filter header.
4. Slide the new element onto the grommet post on the
bottom of the filter header until the element no longer
easily moves up into the filter header. Now rotate the
element (may take almost 1 full turn) with a slight
upward pressure until the element begins to further
engage the header. With the proper orientation now
established apply additional pressure to seat the ele-
ment in the filter header. You should feel the element
“pop” into place when properly seated.
Note: The element will only go on one way. Never
use excessive force when mounting the element to
the header.
5. Slide the quick change ring up over the element and
rotate counter clockwise until an audible click or pop
is heard. If you do not hear the click you have not
rotated the ring far enough and the element is not in
the locked position. Another indication that the ring is
in the locked position is that one set (it doesnʼt matter
which one) of arrows located on the outside of the
ring should be located directly under the air vent
valve.
6. Open the fuel shutoff valve.
7. Open the air vent valve on the front of the filter header
until fuel emerges free of air bubbles and then close
the air vent valve.
Note : Consult your engine operation manual for infor-
mation on air bleeding the entire fuel system.
SECONDARY FUEL FILTER
The Secondary Fuel Filter has a quick change element
mounted to the engine similar to the Water Separator.
Consult your engine operation manual for complete infor-
mation on service intervals and element changing proce-
dures.
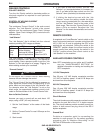
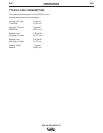
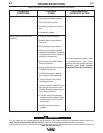
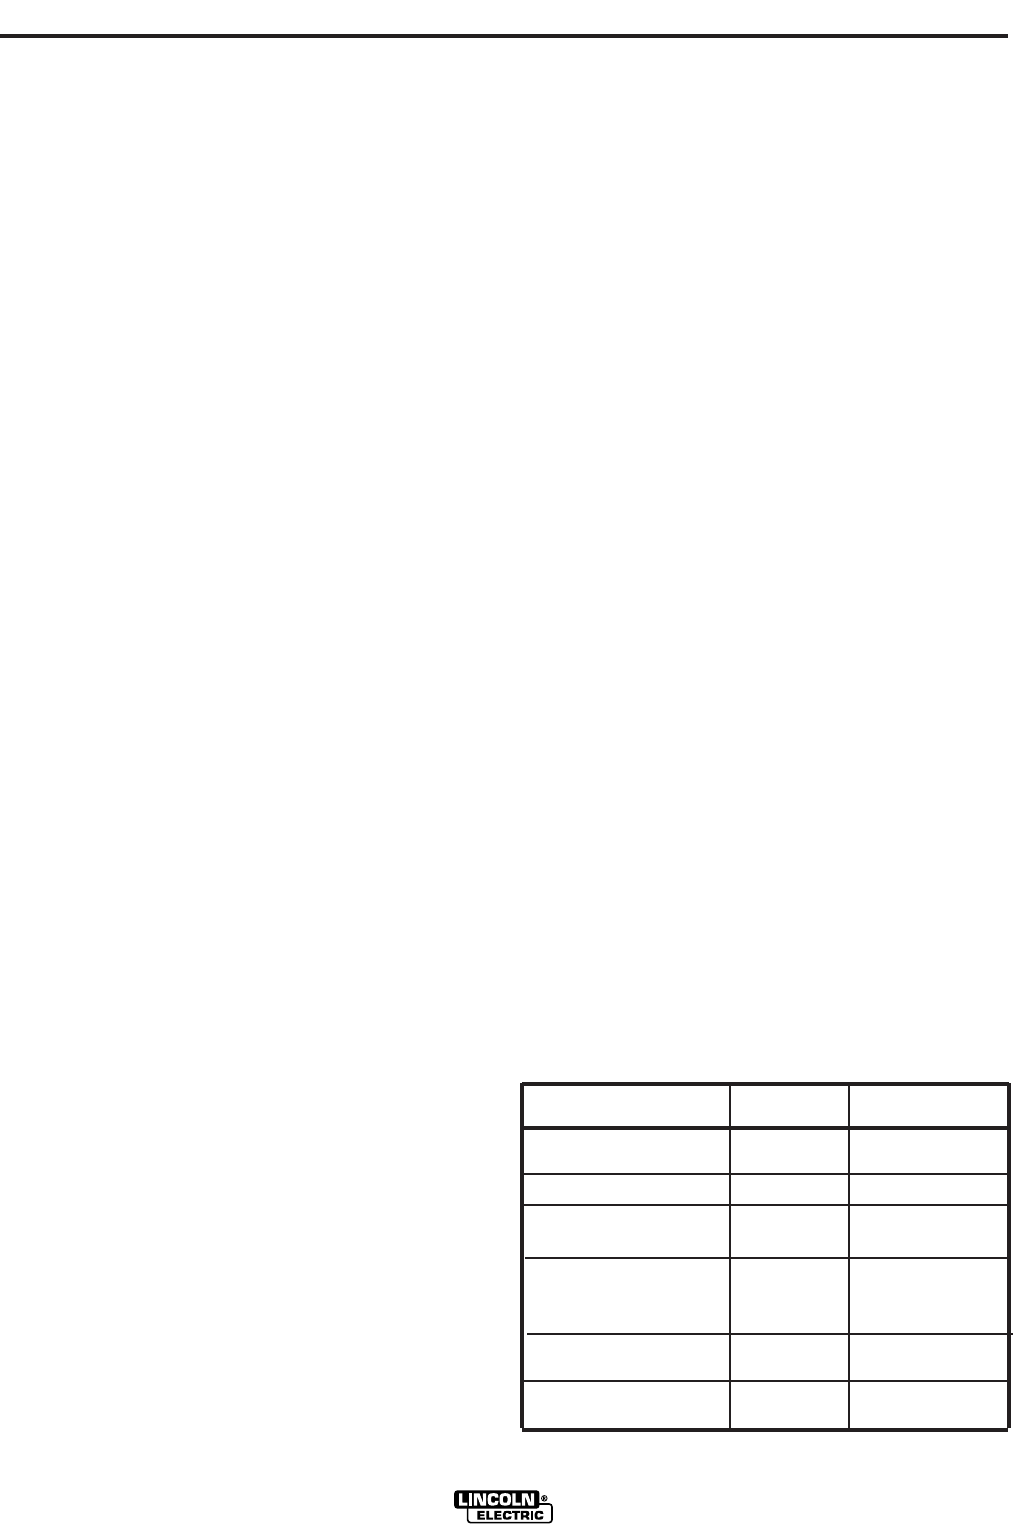
ENGINE MAINTENANCE COMPONENTS
ITEM MAKE PART NUMBER
Engine Air Filter Donaldson P822768
Fan Belt Perkins 2614B555 043
Water Separator Lincoln M16890-C
Element Stanadyne 31572
Fuel Pre-Filter Screen Lincoln M16890-B
Stanadyne 29575
Fuel Filter Perkins 26560201
Engine Oil Filter Perkins 2654407
SAE-400 SEVERE DUTY