


OperationGuide
Operation Guide
5
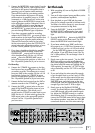
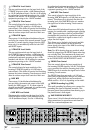
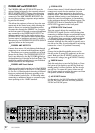
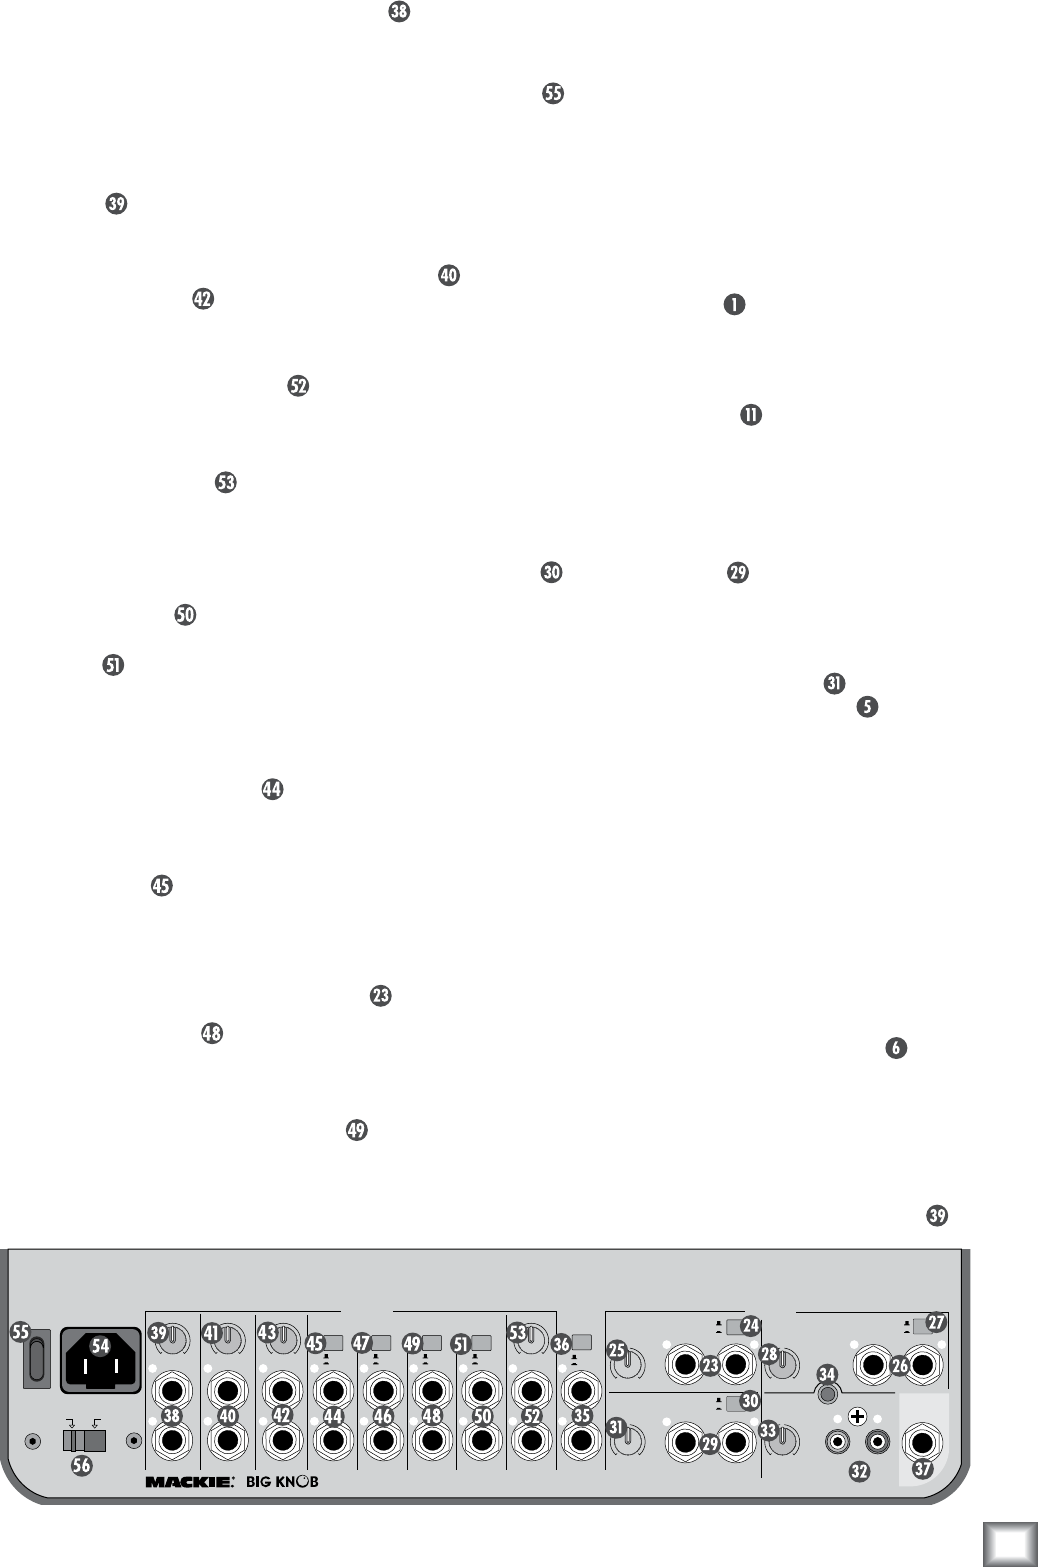
3. Connect the MONITOR A output jacks on the
rear panel of Big Knob to a pair of active studio
monitors (or the inputs of an amplifier that is
powering a pair of passive studio monitors).
These will be located at your mixing position.
If you know whether the inputs to the active
studio
monitors (or amplifier) accept a –10 dBV
(consumer)
or +4 dBu input level, set the trim
control above the MONITOR A output jacks
to the appropriate position. Otherwise, leave it
at the –10 dBV position for now. You can con-
nect additional speakers to the MONITOR B
and MONITOR C output jacks so you can hear
your mix through different types of speakers.
4. If you have a separate studio for recording,
connect the STUDIO OUTS to a pair of active
studio monitors (or the inputs of an amplifier that
is powering a pair of passive studio monitors).
These will be located in studio for the talent.
Set the trim control above the STUDIO OUTS
output jacks to the appropriate position, or leave
it at the –10 dBV position if you’re not sure.
5. If you have a headphone distribution amplifier
for monitoring while recording, connect the
PHONES AMP output jacks to the inputs
of
the headphone amp. Set the +4/–10 level
switch above the PHONES AMP output
jacks to the appropriate position, or leave it at
the –10 position (pushed in) if you’re not sure.
For Recording
6. Connect the 2-TRACK A
outputs to the line-
level inputs of any recording device, like a DAT
or cassette recorder. This allows you to record
from your DAW to the recorder. Set the +4/–10
level switch above the 2-TRACK A output
jacks to the appropriate position, or leave it at
the –10 position (pushed in) if you’re not sure.
7. Connect the line-level outputs from the DAT or
cassette recorder to the 2-TRACK A inputs.
8. Connect the DAW
output jacks on the rear
panel of Big Knob to the stereo inputs of your
DAW’s audio interface. This allows you to
record from the 2-TRACK recorder back to your
DAW. Set the +4/–10 level switch above the
DAW output jacks to the appropriate position,
or leave it at the –10 position (pushed in) if
you’re not sure.
SettheLevels
1. With everything off, turn on Big Knob’s POWER
switch first.
2.
Turn on all other external power amplifiers, active
speakers, and headphone amplifiers.
3. Start playback on your DAW and play some
-
thing you’ve already recorded (or a demo track).
You want to be able to listen to it over the moni-
tor speakers connected to Big Knob.
4. Press the DAW MIX
button in the INPUT
SOURCE SELECT section on the front panel.
The LED above the DAW MIX button should
light.
5.
Press the MONITOR A button in the MONITOR
SELECT section on the front panel. The LED
above the MONITOR A button should light.
6. If you know whether your DAW’s audio inter
-
face
output is at a –10 dBV level (consumer) or a
+4 dBu
level (pro), set the +4/–10 level switch
for the DAW MIX inputs to the appropri-
ate position. If you don’t know, leave it out (in
the +4 dBu position). We can change it later if
we need to.
7. Slowly turn up the trim control
for the DAW
MIX input until you see the meters on the
front panel lighting and dancing happily. Adjust
the control until the meters are lighting the “0”
LED regularly. You want the “+8” LED to light
only occasionally, and the “OL” LED to not light
at all.
8. If you can’t adjust the trim control far enough
to get the signal level up to the 0 and +5 LEDs
on the meter, turn the trim control all the way
down, push in the +4/–10 level switch for the
DAW MIX input, and slowly turn up the trim
control again. Now the signal should be strong
enough to get the 0 and +5 LEDs to light.
9.
Slowly turn up the Big Knob VOLUME
control.
You should begin to hear playback from
your DAW through your studio monitor speak-
ers. Adjust the VOLUME control to a comfort-
able listening level. If it seems like you have to
turn up the VOLUME control all the way to hear
the monitor speakers, turn down the VOLUME
control and check to see if the trim control
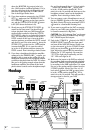
POWER
ON
AC SELECT
220
-
240V
100
-
120V
BAL/UNBAL
MONITOR
A
2
-
TRACK
A
2
-
TRACK
B
OUTPUTS
DAW
OUTPUT
PHONES
AMP
STUDIO
BAL/UNBAL
+
4dB
-10dB
+
4dB
-10dB
+
4dB
-10dB
+
4dB
-10dB
+
4dB
-10dB
BAL/UNBAL
L
R
DAW
PHONES
MIX INPUT
-
10dB +4dB
MONITOR
B
BAL/UNBAL
L
R
-
10dB +4dB
MONITOR
C
BAL/UNBAL
L
R
L
R
L
R
L
R
L
R
L
R
L
R
-
10dB
+
4dB
BAL/UNBAL BAL/UNBAL BAL/UNBAL BAL/UNBAL
-
10dB
+
4dB
BAL/
UNBAL
BAL/
UNBAL
(MONO)
RIAA
SOURCES
2
-
TRACK
B
(MONO)
-
10dB
+
4dB
-
10dB
+
4dB
-
10dB
+
4dB
DAW
MIX
PHONO
GROUND
TALK BACK
FOOT
SWITCH
L
R
BAL/
UNBAL
(MONO)
L
R
L
R
L
R
-
10dB
+
10dB
-
10dB
+
10dB
-
10dB
+
10dB
-
10dB
+
10dB
2
-
TRACK
A
U U
U U