


5
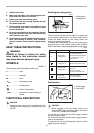
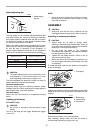
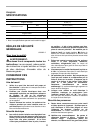
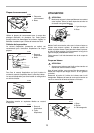
Speed adjusting dial
The tool speed can be infinitely adjusted between 800
and 2,800 strokes per minute by turning the adjusting
dial. Higher speed is obtained when the dial is turned in
the direction of number 5; lower speed is obtained when
it is turned in the direction of number 1.
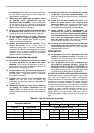
Refer to the table to select the proper speed for the work-
piece to be cut. However, the appropriate speed may dif-
fer with the type or thickness of the workpiece. In
general, higher speeds will allow you to cut workpieces
faster but the service life of the blade will be reduced.
CAUTION:
• The speed adjusting dial can be turned only as far
as 5 and back to 1. Do not force it past 5 or 1, or the
speed adjusting function may no longer work.
The tools equipped with electronic function are easy to
operate because of the following features.
Constant speed control
Electronic speed control for obtaining constant speed.
Possible to get fine finish, because the rotating speed is
kept constant even under load condition.
Soft start feature
Safety and soft start because of suppressed starting
shock.
Lighting up the lamps
For 4340FCT only
CAUTION:
• Do not look in the light or see the source of light
directly.
To turn on the lamp, pull the trigger. Release the trigger
to turn it off.
NOTE:
• Use a dry cloth to wipe the dirt off the lens of lamp.
Be careful not to scratch the lens of lamp, or it may
lower the illumination.
ASSEMBLY
CAUTION:
• Always be sure that the tool is switched off and
unplugged before carrying out any work on the tool.
Installing or removing saw blade
CAUTION:
• Always clean out all chips or foreign matter
adhering to the blade and/or blade holder. Failure to
do so may cause insufficient tightening of the blade,
resulting in a serious personal injury.
• Do not touch the blade or the workpiece
immediately after operation; they may be extremely
hot and could burn your skin.
• Tighten the saw blade securely. Failure to do so
may cause a serious injury.
• When you remove the saw blade, be careful not to
hurt your fingers with the top of the blade or the tips
of workpiece.
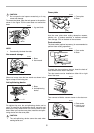
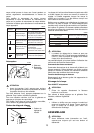
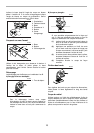
To install the blade, open the tool opener to the position
shown in the figure.
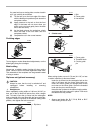
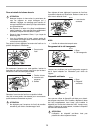
Keeping that situation, insert the saw blade into the blade
clamp as far as the two protrusions of the blade can not
be seen.
Return the tool opener to its original position.
After installing, always make sure that the blade is
securely held in place by trying to pull it out.
1. Speed adjust-
ing dial
1
001908
Workpiece to be cut Number on adjusting dial
Wood 4 - 5
Mild steel 3 - 5
Stainless steel 3 - 4
Aluminum 3 - 5
Plastics 1 - 4
006368
1. Tool opener
1. Blade clamp
2. Jig saw blade
3. Protrusions
1
001909
1
2
3
001910