


8
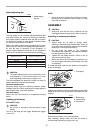
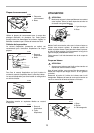
You need not bore a starting hole or make a lead-in
cut if you carefully do as follows.
(1) Tilt the tool up on the front edge of the base
with the blade point positioned just above the
workpiece surface.
(2) Apply pressure to the tool so that the front
edge of the base will not move when you
switch on the tool and gently lower the back
end of the tool slowly.
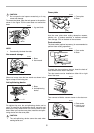
(3) As the blade pierces the workpiece, slowly
lower the base of the tool down onto the
workpiece surface.
(4) Complete the cut in the normal manner.
Finishing edges
To trim edges or make dimensional adjustments, run the
blade lightly along the cut edges.
Metal cutting
Always use a suitable coolant (cutting oil) when cutting
metal. Failure to do so will cause significant blade wear.
The underside of the workpiece can be greased instead
of using a coolant.
Rip fence set (optional accessory)
CAUTION:
• Always be sure that the tool is switched off and
unplugged before installing or removing
accessories.
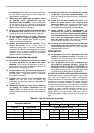
1. Straight cuts
When repeatedly cutting widths of 160 mm (6-5/16”) or
less, use of the rip fence will assure fast, clean, straight
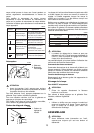
cuts. To install, insert the rip fence into the rectangular
hole on the side of the tool base with the fence guide fac-
ing down. Slide the rip fence to the desired cutting width
position, then tighten the bolt to secure it.
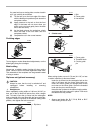
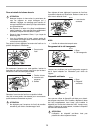
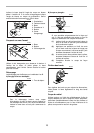
2. Circular cuts
When cutting circles or arcs of 170 mm (6-11/16”) or less
in radius, install the rip fence as follows.
Insert the rip fence into the rectangular hole on the
side of the base with the fence guide facing up.
Insert the circular guide pin through either of the
two holes on the fence guide. Screw the threaded
knob onto the pin to secure the pin.
Now slide the rip fence to the desired cutting radius,
and tighten the bolt to secure it in place. Then move
the base all the way forward.
NOTE:
• Always use blades No. B-17, B-18, B-26 or B-27
when cutting circles or arcs.
1. Rip fence
001920
1
001924
1. Bolt
2. Fence guide
3. Hex wrench
1. Fence guide
2. Threaded knob
3. Circular guide
pin
1
2
3
001925
001926
1
2
3
001927