


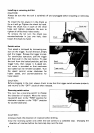

Installing or removing drill bit
CAUTION
:
Always be sure that the tool
is
switched off and unplugged before installing or removing
the bit.
To install the bit, place
it
in the chuck
as
far
as
it
will go. Tighten the chuck by hand.
Place the chuck key in each
of
the three
holes and tighten clockwise. Be sure to
tighten
all
three chuck holes evenly.
To remove the bit turn the chuck key
counterclockwise in just one hole, then
loosen the chuck by hand.
Switch action
Tool speed
is
increased by increasing pres-
sure on the trigger. To start the tool, simply
pull the trigger.
Release
the trigger to stop.
For continuous operation, pull the trigger
and then push in the lock button. To stop
the tool from the locked position, pull the
trigger fully, then release it.
A
speed con-
trol screw
is
provided
so
that maximum
tool speed can be limited (variable). Turn
the speed control screw clocksiwe for
higher speed, and counterclockwise for
lower speed.
CAUTION
:
Before plugging in the tool, always check to
see
that the trigger switch actuates properly
and returns to the "OFF" position when released.
Reversing switch action
This tool has
a
reversing switch to change
the direction of rotation. Move the revers-
ing switch lever to the
"FWD"
position for
clockwise rotation or the
"REV"
position
for counterclockwise
.
CAUTION
:
0
Always check the direction
of
rotation before drilling.
0
Use the reversing switch only when the tool comes to
a
complete stop.
Changing the
direction of rotation before the tool stop may ruin the tool.
4