


10
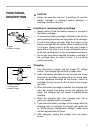
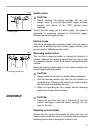
Installing or removing socket
To install the socket, push it onto the anvil of the tool until it
locks into place.
To remove the socket, simply pull it off.
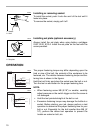
Installing set plate (optional accessory)
Always install the set plate when using battery cartridges
9100, 9102, 9101A. Install the set plate on the tool with the
screw provided.
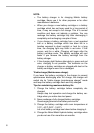
OPERATION
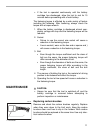
The proper fastening torque may differ depending upon the
kind or size of the bolt, the material of the workpiece to be
fastened, etc. The relation between fastening torque and fas-
tening time is shown in the figures.
Hold the tool firmly and place the socket over the bolt or nut.
Turn the tool on and fasten for the proper fastening time.
NOTE:
• When fastening screw M8 (5/16”) or smaller, carefully
adjust pressure on the switch trigger so that the screw is
not damaged.
• Hold the tool pointed straight at the bolt or nut.
• Excessive fastening torque may damage the bolt/nut or
socket. Before starting your job, always perform a test
operation to determine the proper fastening time for your
bolt or nut. Especially for the bolt smaller than M8 (5/
16”), perform the above test operation to prevent the
trouble on socket or bolt, etc.
1. Socket
2. Anvil
1
2
002339
1. Screw
2. Set plate
1
2
002344
N.m
(ft.lbs)
80
(58)
60
(43)
40
(29)
20
(14)
0 1.0 2.0
3.0
(S)
M12 (1/2”)
M10 (3/8”)
M8 (5/16”)
M12 (1/2”)
M10 (3/8”)
M8 (5/16”)
Fastening time
Fastening torque
Proper fastening torque
Standard bolt
002354
N.m
(ft.lbs)
80
(58)
60
(43)
40
(29)
20
(14)
0 1.0 2.0
3.0
(S)
M10 (3/8”)
M8 (5/16”)
M10 (3/8”)
M8 (5/16”)
Fastening time
Fastening torque
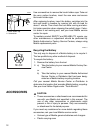
High tensile bolt
Proper fastening torque
002355