


5
FUNCTIONAL DESCRIPTION
CAUTION:
• Always be sure that the tool is switched off and
unplugged before adjusting or checking function on
the tool.
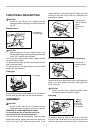
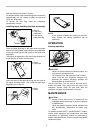
Switch action
1
2
003280
CAUTION:
• Before plugging in the tool, always check to see
that the switch trigger actuates properly and returns
to the "OFF" position when released.
To start the tool, simply pull the switch trigger. Release
the switch trigger to stop.
For continuous operation, pull the switch trigger and then
push in the lock button.
To stop the tool from the locked position, pull the switch
trigger fully, then release it.
Front grip
1
003295
The front grip position can be changed in 90° increments.
Pull the front grip and rotate it to the desired position.
ASSEMBLY
CAUTION:
• Always be sure that the tool is switched off and
unplugged before carrying out any work on the tool.
Installing or removing abrasive paper
For conventional type of abrasive paper with
pre-punched holes (standard equipment):
Turn the clamp lever counterclockwise. Insert the paper
end into the clamper, aligning the holes in the paper with
those in the pad. Then return the clamp lever to the
original position to secure the paper. Repeat the same
process for the other end of the tool, maintaining the
proper paper tension.
Open
1
2
3
003307
003309
For the velcro type of abrasive paper (accessory)
1
2
004435
Remove all dirt or foreign matter from the pad. Attach the
paper to the pad, aligning the holes in the paper with
those in the pad.
CAUTION:
• Always use velcro type of abrasive papers. Never
use pressure-sensitive abrasive papers.
Dust bag
123
4
5
003317
To install the dust bag, align the mark on the bag's
entry port with the
mark on the dust spout of the tool
and fit the entry port onto the dust spout. Then turn the
1.
Mark
2.
Mark
3. Dust bag
4. Entry port
5. Dust spout
1. Velcro type of
abrasive paper
2. Pad
1. Conventional
type of abrasive
paper
2. Clamp lever
3. Pad
1. Front grip
1. Lock button
2. Switch trigger