


5
ASSEMBLY
CAUTION:
• Always be sure that the tool is switched off and
unplugged before carrying out any work on the tool.
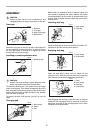
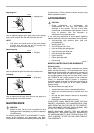
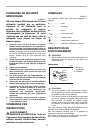
Front grip
Install the front grip on the tool so that its protrusions fit
into the matching notches in the front of the tool. Secure
the front grip using a screwdriver to tighten the screw
through the hole in the front grip.
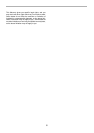
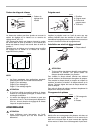
Installing or removing abrasive disc
CAUTION:
• Always use hook-and-loop system abrasive discs.
Never use pressure-sensitive abrasive discs.
To install the abrasive disc, first remove all dirt or foreign
matter from the pad. Then attach the abrasive disc to the
pad, using the hook-and-loop system of the abrasive disc
and the pad. Be careful to align the holes in the abrasive
disc with those in the pad.
To remove the disc from the pad, just pull up from its
edge.
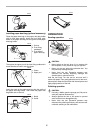
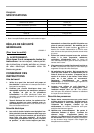
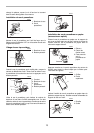
Changing pad
Makita offers an extensive range of optional super soft
and standard equipped soft pads. Remove the screw
counterclockwise from the center of the base with a hex
wrench. After changing the pad, tighten the screw clock-
wise securely.
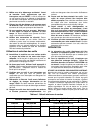
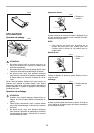
Installing dust bag
Install the dust bag on the tool so that the arrow with “UP”
indicated on the dust nozzle points upward.
Emptying dust bag
When the dust bag is about half full, switch off and
unplug the tool. Hold the tool and remove the dust bag
from the dust nozzle while pressing the push button.
After emptying the dust bag, insert the hook on the dust
nozzle into the rectangular hole on one side of the dust
bag frame and push up the dust bag frame until it clicks
into place on the push button.
1. Notches
2. Front grip
3. Hole in front grip
4. Screwdriver
1. Abrasive disc
1. Hex wrench
2. Screw
3. Pad
4
3
2
1
003738
1
003739
1
2
3
003740
1. Dust nozzle
2. Dust bag
1. Dust nozzle
2. Push button
1. Hook
2. Dust nozzle
3. Dust bag
4. Push button
1
2
003741
1
2
003735
1
2
3
4
003736