


7
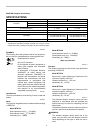
LED indicator status Remaining battery capacity
About 50% or more
About 20% - 50%
About less than 20%
012023
NOTE:
• Before checking the remaining battery capacity, be
sure to stop the tool.
ASSEMBLY
CAUTION:
• Always be sure that the tool is switched off and the
battery cartridge is removed before carrying out
any work on the tool.
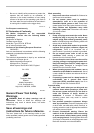
Installing or removing driver bit or socket bit
004521
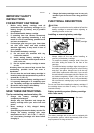
Use only bits that has inserting portion shown in the
figure.
For tool with shallow bit hole
A=12mm
B=9mm
Use only these type of bit. Follow the
procedure (1).
(Note) Bit-piece is not necessary.
006348
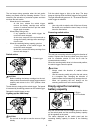
For tool with deep bit hole
To install these types of bits, follow
the procedure (1).
To install these types of bits, follow
the procedure (2).
(Note) Bit-piece is necessary for
installing the bit.
A=17mm
B=14mm
A=12mm
B=9mm
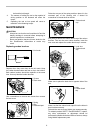
011405
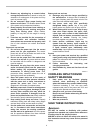
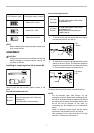
1. To install the bit, pull the sleeve and insert the bit
into the sleeve as far as it will go.
1
2
012063
2. To install the bit, insert the bit-piece and bit into the
sleeve as far as it will go. The bit-piece should be
inserted into the sleeve with its pointed end facing
in. Then release the sleeve to secure the bit.
1
2
012013
To remove the bit, pull the sleeve and pull the bit out.
NOTE:
• For all countries other than Europe, it's not
necessary to pull the sleeve when installing the bit.
• If the bit is not inserted deep enough into the sleeve,
the sleeve will not return to its original position and
the bit will not be secured. In this case, try
re-inserting the bit according to the instructions
above.
• When it is difficult to insert the bit, pull the sleeve
and insert it into the sleeve as for as it will go.
• After inserting the bit, make sure that it is firmly
secured. If it comes out, do not use it.
1. Bit-piece
2. Bit
1. Bit
2. Sleeve