


5
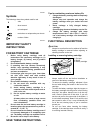
Switch action
1
A
B
008147
CAUTION:
• Before inserting the battery cartridge into the tool,
always check to see that the switch trigger
actuates properly and returns to the "OFF" position
when released.
• Change the direction of rotation only when the tool
comes to a complete stop. Changing it before the
tool stops may damage the tool.
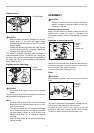
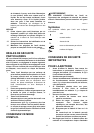
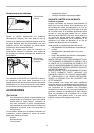
The switch is reversible, providing either clockwise or
counterclockwise rotation. To start the tool, simply pull
the lower part (A) of the switch trigger for clockwise or
the upper part (B) for counterclockwise. Release the
switch trigger to stop.
Lighting up the front lamp
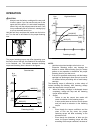
1
2
008407
CAUTION:
• Do not look in the light or see the source of light
directly.
Push the upper position of the lamp switch for turning on
the light and the lower position for off.
NOTE:
• Use a dry cloth to wipe the dirt off the lens of lamp.
Be careful not to scratch the lens of lamp, or it may
lower the illumination.
• The light is provided with anti excessive discharge
circuit. When the lamp does not light up even after
the light switch is turned on, there is likely to be
battery power drop. Try to charge the battery
cartridge.
• Keep the lamp switch in "off" position while not in
need of the light.
ASSEMBLY
CAUTION:
• Always be sure that the tool is switched off and the
battery cartridge is removed before carrying out
any work on the tool.
Selecting correct socket
Always use the correct size socket for bolts and nuts. An
incorrect size socket will result in inaccurate and
inconsistent fastening torque and/or damage to the bolt
or nut.
Installing or removing socket
1
2
3
4
3
4
008408
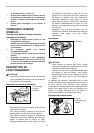
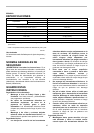
Align the hole in the side of the socket with the detent pin
on the anvil and push it onto the anvil of the tool until it
locks into place. Tap it lightly if required.
To remove the socket, simply pull it off.
Hook
CAUTION:
After installing the hook, make sure that it is screwed
firmly.
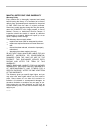
1
2
3
008150
The hook is convenient for temporarily hanging the tool.
This can be installed on either side of the tool.
To install the hook, insert it into a groove in the tool
housing on either side and then secure it with a screw.
To remove, loosen the screw and then take it out.
1. Groove
2. Screw
3. Hook
1. Socket
2. Hole
3. Anvil
4. Detent pin
1. Lamp
2. Lamp switch
1. Switch trigger